26 KiB
Site Authoring and Deployment Guide
The document contains the instructions for standing up a greenfield Airship site. This can be broken down into two high-level pieces:
- Site authoring guide(s): Describes how to craft site manifests and configs required to perform a deployment. The primary site authoring guide is for deploying Airship sites, where OpenStack is the target platform deployed on top of Airship.
- Deployment guide(s): Describes how to apply site manifests for a given site.
This document is an "all in one" site authoring guide + deployment
guide for a standard Airship deployment. For the most part, the site
authoring guidance lives within airship-seaworthy reference
site in the form of YAML comments.
Terminology
Cloud: A platform that provides a standard set of interfaces for IaaS consumers.
OSH: (OpenStack Helm) is a collection of Helm charts used to deploy OpenStack on kubernetes.
Undercloud/Overcloud: Terms used to distinguish which cloud is deployed on top of the other. In Airship sites, OpenStack (overcloud) is deployed on top of Kubernetes (undercloud).
Airship: A specific implementation of OpenStack Helm charts onto kubernetes, the deployment of which is the primary focus of this document.
Control Plane: From the point of view of the cloud service provider, the control plane refers to the set of resources (hardware, network, storage, etc) sourced to run cloud services.
Data Plane: From the point of view of the cloud service provider, the data plane is the set of resources (hardware, network, storage, etc.) sourced to run consumer workloads. When used in this document, "data plane" refers to the data plane of the overcloud (OSH).
Host Profile: A host profile is a standard way of configuring a bare metal host. Encompasses items such as the number of bonds, bond slaves, physical storage mapping and partitioning, and kernel parameters.
Component Overview
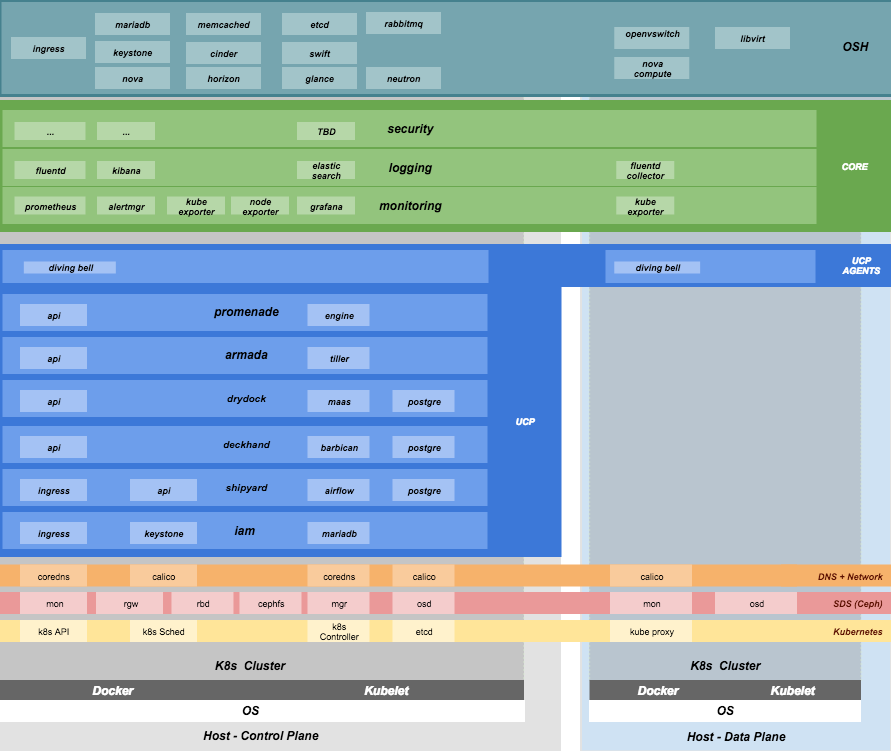
Node Overview
This document refers to several types of nodes, which vary in their purpose, and to some degree in their orchestration / setup:
- Build node: This refers to the environment where configuration documents are built for your environment (e.g., your laptop)
- Genesis node: The "genesis" or "seed node" refers to a node used to get a new deployment off the ground, and is the first node built in a new deployment environment.
- Control / Controller nodes: The nodes that make up the control plane. (Note that the Genesis node will be one of the controller nodes.)
- Compute nodes / Worker Nodes: The nodes that make up the data plane
Support
Bugs may be viewed and reported at the following locations, depending on the component:
OpenStack Helm: OpenStack Storyboard group
Airship: Bugs may be filed using OpenStack Storyboard for specific projects in Airship group:
Hardware Prep
Disk
- For servers that are in the control plane (including Genesis):
- Two-disk RAID-1: Operating System
- Two disks JBOD: Ceph Journal/Meta for control plane
- Remaining disks JBOD: Ceph OSD for control plane
- For servers that are in the tenant data plane (compute nodes):
- Two-disk RAID-1: Operating System
- Two disks JBOD: Ceph Journal/Meta for tenant-ceph
- Two disks JBOD: Ceph OSD for tenant-ceph
- Remaining disks need to be configured according to the host profile target for each given server (e.g. RAID-10 for OpenStack Ephemeral).
BIOS and IPMI
- Virtualization enabled in BIOS
- IPMI enabled in server BIOS (e.g., IPMI over LAN option enabled)
- IPMI IPs assigned, and routed to the environment you will deploy into Note: Firmware bugs related to IPMI are common. Ensure you are running the latest firmware version for your hardware. Otherwise, it is recommended to perform an iLo/iDrac reset, as IPMI bugs with long-running firmware are not uncommon.
- Set PXE as first boot device and ensure the correct NIC is selected for PXE
Network
- You have a network you can successfully PXE boot with your network topology and bonding settings (dedicated PXE interace on untagged/native VLAN in this example)
- You have (VLAN) segmented, routed networks accessible by all nodes
for:
- Management network(s) (k8s control channel)
- Calico network(s)
- Storage network(s)
- Overlay network(s)
- Public network(s)
HW Sizing and minimum requirements
| Node | disk | memory | cpu |
|---|---|---|---|
|
|
|
|
| Genesis |
|
|
|
| Control |
|
|
|
| Compute |
|
|
|
- Workload driven (determined by host profile)
Establishing build node environment
On the machine you wish to use to generate deployment files, install required tooling:
sudo apt -y install docker.io gitClone and link the required git repos as follows:
git clone https://git.openstack.org/openstack/airship-pegleg
git clone https://git.openstack.org/openstack/airship-treasuremap
Building Site documents
This section goes over how to put together site documents according to your specific environment, and generate the initial Promenade bundle needed to start the site deployment.
Preparing deployment documents
In its current form, pegleg provides an organized structure for YAML
elements, in order to separate common site elements (i.e.,
global folder) from unique site elements (i.e.,
site folder).
To gain a full understanding of the pegleg structure, it is highly recommended to read pegleg documentation on this here.
The airship-seaworthy site may be used as reference
site. It is the principal pipeline for integration and continuous
deployment testing of Airship.
Change directory to the airship-treasuremap/site folder
and copy the airship-seaworthy site as follows:
NEW_SITE=mySite # replace with the name of your site
cd airship-treasuremap/site
cp -r airship-seaworthy $NEW_SITE
Remove airship-seaworthy specific certificates.
rm -f airship-treasuremap/site/${NEW_SITE}/secrets/certificates/certificates.yamlYou will then need to manually make changes to these files. These site manifests are heavily commented to explain parameters, and importantly identify all of the parameters that need to change when authoring a new site.
These areas which must be updated for a new site are flagged with the
label NEWSITE-CHANGEME in YAML commentary. Search for all
instances of NEWSITE-CHANGEME in your new site definition,
and follow the instructions that accompany the tag in order to make all
needed changes to author your new Airship site.
Because some files depend on (or will repeat) information from others, the order in which you should build your site files is as follows:
- site/$NEW_SITE/networks/physical/networks.yaml
- site/$NEW_SITE/baremetal/nodes.yaml
- site/$NEW_SITE/networks/common-addresses.yaml
- site/$NEW_SITE/pki/pki-catalog.yaml
- All other site files
Register DNS names
Register the following list of DNS names:
cloudformation.DOMAIN
compute.DOMAIN
dashboard.DOMAIN
grafana.DOMAIN
iam.DOMAIN
identity.DOMAIN
image.DOMAIN
kibana.DOMAIN
nagios.DOMAIN
network.DOMAIN
nova-novncproxy.DOMAIN
object-store.DOMAIN
orchestration.DOMAIN
placement.DOMAIN
shipyard.DOMAIN
volume.DOMAIN
Here DOMAIN is a name of ingress domain, you can find it
in the data.dns.ingress_domain section of
site/${NEW_SITE}/secrets/certificates/ingress.yaml
configuration file.
Run the following command to get up to date list of required DNS names:
grep -E 'host: .+DOMAIN' site/${NEW_SITE}/software/config/endpoints.yaml | \
    sort -u | awk '{print $2}'
Update Secrets
Replace passphrases under
site/${NEW_SITE}/secrets/passphrases/ with random generated
ones:
- Passpharses generation
openssl rand -hex 10 - UUID generation
uuidgen(e.g. for Ceph filesystem ID) - Update
secrets/passphrases/ipmi_admin_password.yamlwith IPMI password - Update
secrets/passphrases/ubuntu_crypt_password.yamlwith password hash:
python3 -c "from crypt import *; print(crypt('<YOUR_PASSWORD>', METHOD_SHA512))"Configure certificates in
site/${NEW_SITE}/secrets/certificates/ingress.yaml, they
need to be issued for the domains configured in
Register DNS names section.
Caution
It is required to configure valid certificates, self-signed certificates are not supported.
Control Plane & Tenant Ceph Cluster Notes
Configuration variables for ceph control plane are located in:
site/${NEW_SITE}/software/charts/ucp/ceph/ceph-osd.yamlsite/${NEW_SITE}/software/charts/ucp/ceph/ceph-client.yaml
Configuration variables for tenant ceph are located in:
site/${NEW_SITE}/software/charts/osh/openstack-tenant-ceph/ceph-osd.yamlsite/${NEW_SITE}/software/charts/osh/openstack-tenant-ceph/ceph-client.yaml
Setting highlights:
- data/values/conf/storage/osd[*]/data/location: The block device that will be formatted by the Ceph chart and used as a Ceph OSD disk
- data/values/conf/storage/osd[*]/journal/location: The block device backing the ceph journal used by this OSD. Refer to the journal paradigm below.
- data/values/conf/pool/target/osd: Number of OSD disks on each node
Assumptions:
- Ceph OSD disks are not configured for any type of RAID, they are configured as JBOD when connected through a RAID controller. If RAID controller does not support JBOD, put each disk in its own RAID-0 and enable RAID cache and write-back cache if the RAID controller supports it.
- Ceph disk mapping, disk layout, journal and OSD setup is the same across Ceph nodes, with only their role differing. Out of the 4 control plane nodes, we expect to have 3 actively participating in the Ceph quorom, and the remaining 1 node designated as a standby Ceph node which uses a different control plane profile (cp_-secondary) than the other three (cp_-primary).
- If doing a fresh install, disk are unlabeled or not labeled from a previous Ceph install, so that Ceph chart will not fail disk initialization.
It's highly recommended to use SSD devices for Ceph Journal partitions.
If you have an operating system available on the target hardware, you can determine HDD and SSD devices with:
lsblk -d -o name,rotawhere a rota (rotational) value of 1
indicates a spinning HDD, and where a value of 0 indicates
non-spinning disk (i.e. SSD). (Note - Some SSDs still report a value of
1, so it is best to go by your server specifications).
For OSDs, pass in the whole block device (e.g.,
/dev/sdd), and the Ceph chart will take care of disk
partitioning, formatting, mounting, etc.
For Ceph Journals, you can pass in a specific partition (e.g.,
/dev/sdb1), note that it's not required to pre-create these
partitions, Ceph chart will create journal partitions automatically if
they don't exist. By default the size of every journal partition is 10G,
make sure there is enough space available to allocate all journal
partitions.
Consider the following example where:
- /dev/sda is an operating system RAID-1 device (SSDs for OS root)
- /dev/sd[bc] are SSDs for ceph journals
- /dev/sd[efgh] are HDDs for OSDs
The data section of this file would look like:
data:
  values:
    conf:
      storage:
        osd:
          - data:
              type: block-logical
              location: /dev/sde
            journal:
              type: block-logical
              location: /dev/sdb1
          - data:
              type: block-logical
              location: /dev/sdf
            journal:
              type: block-logical
              location: /dev/sdb2
          - data:
              type: block-logical
              location: /dev/sdg
            journal:
              type: block-logical
              location: /dev/sdc1
          - data:
              type: block-logical
              location: /dev/sdh
            journal:
              type: block-logical
              location: /dev/sdc2
Manifest linting and combining layers
After constituent YAML configurations are finalized, use Pegleg to lint your manifests, and resolve any issues that result from linting before proceeding:
sudo airship-pegleg/tools/pegleg.sh repo \
  -r airship-treasuremap lint
Note: P001 and P003 linting errors are
expected for missing certificates, as they are not generated until the
next section. You may suppress these warnings by appending
-x P001 -x P003 to the lint command.
Next, use pegleg to perform the merge that will yield the combined global + site type + site YAML:
sudo sh airship-pegleg/tools/pegleg.sh site \
  -r airship-treasuremap \
  collect $NEW_SITE
Perform a visual inspection of the output. If any errors are
discovered, you may fix your manifests and re-run the lint
and collect commands.
After you have an error-free output, save the resulting YAML as follows:
sudo airship-pegleg/tools/pegleg.sh site \
  -r airship-treasuremap \
  collect $NEW_SITE -s ${NEW_SITE}_collected
It is this output which will be used in subsequent steps.
Lastly, you should also perform a render on the
documents. The resulting render from Pegleg will not be used as input in
subsequent steps, but is useful for understanding what the document will
look like once Deckhand has performed all substitutions, replacements,
etc. This is also useful for troubleshooting, and addressing any
Deckhand errors prior to submitting via Shipyard:
sudo airship-pegleg/tools/pegleg.sh site \
  -r airship-treasuremap \
  render $NEW_SITE
Inspect the rendered document for any errors. If there are errors, address them in your manifests and re-run this section of the document.
Building the Promenade bundle
Clone the Promenade repo, if not already cloned:
git clone https://opendev.org/airship/promenadeRefer to the data/charts/ucp/promenade/reference field
in
airship-treasuremap/global/software/config/versions.yaml.
If this is a pinned reference (i.e., any reference that's not
master), then you should checkout the same version of the
Promenade repository. For example, if the Promenade reference was
86c3c11... in the versions file, checkout the same version
of the Promenade repo which was cloned previously:
(cd promenade && git checkout 86c3c11)Likewise, before running the simple-deployment.sh
script, you should refer to the
data/images/ucp/promenade/promenade field in
~/airship-treasuremap/global/software/config/versions.yaml.
If there is a pinned reference (i.e., any image reference that's not
latest), then this reference should be used to set the
IMAGE_PROMENADE environment variable. For example, if the
Promenade image was pinned to
quay.io/airshipit/promenade:d30397f... in the versions
file, then export the previously mentioned environment variable like
so:
export IMAGE_PROMENADE=quay.io/airshipit/promenade:d30397f...Now, create an output directory for Promenade bundles and run the
simple-deployment.sh script:
mkdir ${NEW_SITE}_bundle
sudo -E promenade/tools/simple-deployment.sh ${NEW_SITE}_collected ${NEW_SITE}_bundle
Estimated runtime: About 1 minute
After the bundle has been successfully created, copy the generated certificates into the security folder. Ex:
mkdir -p airship-treasuremap/site/${NEW_SITE}/secrets/certificates
sudo cp ${NEW_SITE}_bundle/certificates.yaml \
  airship-treasuremap/site/${NEW_SITE}/secrets/certificates/certificates.yaml
Regenerate collected YAML files to include copied certificates:
sudo airship-pegleg/tools/pegleg.sh site \
  -r airship-treasuremap \
  collect $NEW_SITE -s ${NEW_SITE}_collected
Genesis node
Initial setup
Before starting, ensure that the BIOS and IPMI settings match those stated previously in this document. Also ensure that the hardware RAID is setup for this node per the control plane disk configuration stated previously in this document.
Then, start with a manual install of Ubuntu 16.04 on the node you wish to use to seed the rest of your environment standard Ubuntu ISO. Ensure to select the following:
- UTC timezone
- Hostname that matches the Genesis hostname given in
/data/genesis/hostnameinairship-treasuremap/site/${NEW_SITE}/networks/common-addresses.yaml. - At the
Partition Disksscreen, selectManualso that you can setup the same disk partitioning scheme used on the other control plane nodes that will be deployed by MaaS. Select the first logical device that corresponds to one of the RAID-1 arrays already setup in the hardware controller. On this device, setup partitions matching those defined for thebootdiskin your control plane host profile found inairship-treasuremap/site/${NEW_SITE}/profiles/host. (e.g., 30G for /, 1G for /boot, 100G for /var/log, and all remaining storage for /var). Note that the volume size syntax looking like>300gin Drydock means that all remaining disk space is allocated to this volume, and that volume needs to be at least 300G in size. - Ensure that OpenSSH and Docker (Docker is needed because of miniMirror) are included as installed packages
- When you get to the prompt, "How do you want to manage upgrades on this system?", choose "No automatic updates" so that packages are only updated at the time of our choosing (e.g. maintenance windows).
- Ensure the grub bootloader is also installed to the same logical device as in the previous step (this should be default behavior).
After installation, ensure the host has outbound internet access and
can resolve public DNS entries (e.g., nslookup google.com,
curl https://www.google.com).
Ensure that the deployed Genesis hostname matches the hostname in
data/genesis/hostname in
airship-treasuremap/site/${NEW_SITE}/networks/common-addresses.yaml.
If it does not match, then either change the hostname of the node to
match the configuration documents, or re-generate the configuration with
the correct hostname. In order to change the hostname of the deployed
node, you may run the following:
sudo hostname $NEW_HOSTNAME
sudo sh -c "echo $NEW_HOSTNAME > /etc/hostname"
sudo vi /etc/hosts # Anywhere the old hostname appears in the file, replace
                   # with the new hostname
Or to regenerate manifests, re-run the previous two sections with the after updating the genesis hostname in the site definition.
Installing matching kernel version
Install the same kernel version on the Genesis host that MaaS will use to deploy new baremetal nodes.
In order to do this, first you must determine the kernel version that
will be deployed to those nodes. Start by looking at the host profile
definition used to deploy other control plane nodes by searching for
control-plane: enabled. Most likely this will be a file
under global/profiles/host. In this file, find the kernel
info -e.g.:
platform:
  image: 'xenial'
  kernel: 'hwe-16.04'
  kernel_params:
    kernel_package: 'linux-image-4.15.0-34-generic'
In this example, the kernel version is
4.15.0-34-generic. Define any proxy environment variables
needed for your environment to reach public ubuntu package repos, and
install the matching kernel on the Genesis host (make sure to run on
Genesis host, not on the build host):
sudo apt -y install linux-modules-4.15.0-34-generic \
   linux-modules-extra-4.15.0-34-generic \
   linux-image-4.15.0-34-generic linux-headers-4.15.0-34-generic \
   linux-headers-4.15.0-34
Check the installed packages on the genesis host with
dpkg --list. If there are any later kernel versions
installed, remove them with sudo apt remove, so that the
newly install kernel is the latest available.
Install ntpdate/ntp
Install and run ntpdate, to ensure a reasonably sane time on genesis host before proceeding:
sudo apt -y install ntpdate
sudo ntpdate ntp.ubuntu.com
If your network policy does not allow time sync with external time
sources, specify a local NTP server instead of using
ntp.ubuntu.com.
Then, install the NTP client:
sudo apt -y install ntpAdd the list of NTP servers specified in
data/ntp/servers_joined in file
airship-treasuremap/site/${NEW_SITE}/networks/common-address.yaml
to /etc/ntp.conf as follows:
pool NTP_SERVER1 iburst
pool NTP_SERVER2 iburst
(repeat for each NTP server with correct NTP IP or FQDN)
Then, restart the NTP service:
sudo service ntp restartIf you cannot get good time to your selected time servers, consider using alternate time sources for your deployment.
Disable the apparmor profile for ntpd:
sudo ln -s /etc/apparmor.d/usr.sbin.ntpd /etc/apparmor.d/disable/
sudo apparmor_parser -R /etc/apparmor.d/usr.sbin.ntpd
This prevents an issue with the MaaS containers, which otherwise get permission denied errors from apparmor when the MaaS container tries to leverage libc6 for /bin/sh when MaaS container ntpd is forcefully disabled.
Promenade bootstrap
Copy the ${NEW_SITE}_bundle and
${NEW_SITE}_collected directories from the build node to
the genesis node, into the home directory of the user there (e.g.,
/home/ubuntu). Then, run the following script as sudo on
the genesis node:
cd ${NEW_SITE}_bundle
sudo ./genesis.sh
Estimated runtime: 40m
Following completion, run the validate-genesis.sh script
to ensure correct provisioning of the genesis node:
cd ${NEW_SITE}_bundle
sudo ./validate-genesis.sh
Estimated runtime: 2m
Deploy Site with Shipyard
Start by cloning the shipyard repository to the Genesis node:
git clone https://opendev.org/airship/shipyardRefer to the data/charts/ucp/shipyard/reference field in
airship-treasuremap/global/software/config/versions.yaml.
If this is a pinned reference (i.e., any reference that's not
master), then you should checkout the same version of the
Shipyard repository. For example, if the Shipyard reference was
7046ad3... in the versions file, checkout the same version
of the Shipyard repo which was cloned previously:
(cd shipyard && git checkout 7046ad3)Likewise, before running the deckhand_load_yaml.sh
script, you should refer to the
data/images/ucp/shipyard/shipyard field in
airship-treasuremap/global/software/config/versions.yaml.
If there is a pinned reference (i.e., any image reference that's not
latest), then this reference should be used to set the
SHIPYARD_IMAGE environment variable. For example, if the
Shipyard image was pinned to
quay.io/airshipit/shipyard@sha256:dfc25e1... in the
versions file, then export the previously mentioned environment
variable:
export SHIPYARD_IMAGE=quay.io/airshipit/shipyard@sha256:dfc25e1...Export valid login credentials for one of the Airship Keystone users
defined for the site. Currently there is no authorization checks in
place, so the credentials for any of the site-defined users will work.
For example, we can use the shipyard user, with the
password that was defined in
airship-treasuremap/site/${NEW_SITE}/secrets/passphrases/ucp_shipyard_keystone_password.yaml.
Ex:
export OS_USERNAME=shipyard
export OS_PASSWORD=46a75e4...
(Note: Default auth variables are defined here, and should otherwise be correct, barring any customizations of these site parameters).
Next, run the deckhand_load_yaml.sh script providing an absolute path to a directory that contains collected manifests:
sudo -E shipyard/tools/deckhand_load_yaml.sh ${NEW_SITE} $(pwd)/${NEW_SITE}_collectedEstimated runtime: 3m
Now deploy the site with shipyard:
cd shipyard/tools/
sudo -E ./deploy_site.sh
Estimated runtime: 1h30m
The message Site Successfully Deployed is the expected
output at the end of a successful deployment. In this example, this
means that Airship and OSH should be fully deployed.
Disable password-based login on Genesis
Before proceeding, verify that your SSH access to the Genesis node is working with your SSH key (i.e., not using password-based authentication).
Then, disable password-based SSH authentication on Genesis in
/etc/ssh/sshd_config by uncommenting the
PasswordAuthentication and setting its value to
no. Ex:
PasswordAuthentication noThen, restart the ssh service:
sudo systemctl restart ssh