Change-Id: Ifcff9567a09b5e04ce95d0fb48ff2016c8a1dc53 Closes-Bug: 1626190 |
||
|---|---|---|
| config-generator | ||
| devstack | ||
| doc | ||
| etc | ||
| freezer | ||
| specs | ||
| tests | ||
| .coveragerc | ||
| .gitignore | ||
| .gitreview | ||
| .pylintrc | ||
| .testr.conf | ||
| CREDITS.rst | ||
| FAQ.rst | ||
| HACKING.rst | ||
| INSTALL.rst | ||
| LICENSE | ||
| README.rst | ||
| TODO.rst | ||
| requirements.txt | ||
| setup.cfg | ||
| setup.py | ||
| test-requirements.txt | ||
| tox.ini | ||
README.rst
Freezer
Freezer is a Backup Restore DR as a Service platform that helps you to automate the data backup and restore process.
The following features are available:
- Backup your filesystem using point in time snapshot
- Strong encryption supported: AES-256-CFB
- Backup your file system tree directly (without volume snapshot)
- Backup your journaled MongoDB directory tree using lvm snapshot to swift
- Backup MySQL DB with lvm snapshot
- Restore your data from a specific date automatically to your file system
- Low storage consumption as the backup are uploaded as a stream
- Flexible backup policy (incremental and differential)
- Data is archived in GNU Tar format for file based incremental
- Multiple compression algorithm support (zlib, bzip2, xz)
- Remove old backup automatically according to the provided parameters
- Multiple storage media support (Swift, local file system, ssh)
- Flush kernel buffered memory to disk
- Multi platform (Linux, Windows, *BSD, OSX)
- Manage multiple jobs (i.e. multiple backups on the same node)
- Synchronize backups and restore on multiple nodes
- Web user interface integrated with OpenStack Horizon
- Can execute scripts/commands before or after a job execution
Requirements
- OpenStack Swift Account (optional)
- python
- GNU Tar >= 1.26
- gzip, bzip2, xz
- OpenSSL
- python-swiftclient
- python-keystoneclient
- pymongo
- PyMySQL
- libmysqlclient-dev
- sync
- At least 128 MB of memory reserved for Freezer
Windows Requirements
- Python 2.7
- GNU Tar binaries (we recommend to follow [this guide] (https://github.com/openstack-freezer-utils/freezer-windows-binaries#windows-binaries-for-freezer) to install them)
- [OpenSSL pre-compiled for windows] (https://wiki.openssl.org/index.php/Binaries) or [direct download](https://indy.fulgan.com/SSL/openssl-1.0.1-i386-win32.zip)
- [Sync] (https://technet.microsoft.com/en-us/sysinternals/bb897438.aspx)
- [Microsoft Visual C++ Compiler for Python 2.7] (http://aka.ms/vcpython27)
- [PyWin32 for python 2.7] (http://sourceforge.net/projects/pywin32/files/pywin32/Build%20219/)
Add binaries to Windows Path
Go to Control PanelSystem and SecuritySystem and then Advanced System Settings, and click Environment Variables under System Variables edit Path and append in the end. - ;C:\Sync - ;C:\OpenSSL-Win64\bin - ;C:\Python27;C:\Python27\Lib\site-packages\;C:\Python27\Scripts\
The following components support Windows OS Platform:
- freezer-agent
- freezer-scheduler
Install Windows Scheduler
Freezer scheduler on windows run as a windows service and it needs to be installed as a user service.
- open cmd as admin
- whoami
- cd C:\Python27\Lib\site-packages\freezer\scheduler
- python win_service.py --username {whoami} --password {pc-password} install
Unofficial Installer for Windows
Freezer offers a [windows installer] (https://github.com/openstack-freezer-utils/freezer-windows-installer#windows-freezer-installer) supported by the community
Installation & Env Setup
Install required packages
Ubuntu / Debian
Swift client and Keystone client:
$ sudo apt-get install -y python-dev
For python3:
$ sudo apt-get install -y python3-dev
$ sudo easy_install -U pip
MongoDB backup:
$ sudo apt-get install -y python-pymongoMySQL backup:
$ sudo pip install pymysqlFreezer installation from Python package repo:
$ sudo pip install freezerOR:
$ sudo easy_install freezerThe basic Swift account configuration is needed to use freezer. Make sure python-swiftclient is installed.
Also the following ENV vars are needed. You can put them in ~/.bashrc:
export OS_REGION_NAME=region-a.geo-1
export OS_TENANT_ID=<account tenant>
export OS_PASSWORD=<account password>
export OS_AUTH_URL=https://region-a.geo-1.identity.hpcloudsvc.com:35357/v2.0
export OS_USERNAME=automationbackup
export OS_TENANT_NAME=automationbackup

$ source ~/.bashrc
Let's say you have a container called freezer_foobar-container, by executing "swift list" you should see something like:
$ swift list
freezer_foobar-container-2
$
These are just use case example using Swift in the HP Cloud.
Is strongly advised to execute backups using LVM snapshot, so freezer will execute a backup on point-in-time data. This avoids the risk of data inconsistencies and corruption.
Windows
General packages:
> easy_install -U pip
> pip install freezer
The basic Swift account configuration is needed to use freezer. Make sure python-swiftclient is installed:
set OS_REGION_NAME=region-a.geo-1
set OS_TENANT_ID=<account tenant>
set OS_PASSWORD=<account password>
set OS_AUTH_URL=https://region-a.geo-1.identity.hpcloudsvc.com:35357/v2.0
set OS_USERNAME=automationbackup
set OS_TENANT_NAME=automationbackup
Usage Example
Freezer will automatically add the prefix "freezer" to the container name, where it is provided by the user and doesn't already start with this prefix. If no container name is provided, the default is "freezer_backups".
The execution options can be set from the command line and/or config file in ini format. There's an example of the job config file available in freezer/freezer/specs/job-backup.conf.example. Command line options always override the same options in the config file.
Backup
The most simple backup execution is a direct file system backup:
$ sudo freezerc --file-to-backup /data/dir/to/backup
--container freezer_new-data-backup --backup-name my-backup-name

* On windows (need admin rights)*
> freezerc --action backup --mode fs --backup-name testwindows
--path-to-backup "C:\path\to\backup" --container freezer_windows
--log-file  C:\path\to\log\freezer.log
By default --mode fs is set. The command would generate a compressed tar gzip file of the directory /data/dir/to/backup. The generated file will be segmented in stream and uploaded in the swift container called freezer_new-data-backup, with backup name my-backup-name.
Now check if your backup is executing correctly looking at /var/log/freezer.log
Execute a MongoDB backup using lvm snapshot:
We need to check before on which volume group and logical volume our mongo data is. This information can be obtained as per following:
$ mount
[...]
Once we know the volume on which our Mongo data is mounted, we can get the volume group and logical volume info:
$ sudo vgdisplay
[...]
$ sudo lvdisplay
[...]
We assume our mongo volume is "/dev/mongo/mongolv" and the volume group is "mongo":
$ sudo freezerc --lvm-srcvol /dev/mongo/mongolv --lvm-dirmount /var/lib/snapshot-backup
--lvm-volgroup mongo --file-to-backup /var/lib/snapshot-backup/mongod_ops2
--container freezer_mongodb-backup-prod --exclude "*.lock" --mode mongo --backup-name mongod-ops2
Now freezerc creates an lvm snapshot of the volume /dev/mongo/mongolv. If no options are provided, the default snapshot name is "freezer_backup_snap". The snapshot vol will be mounted automatically on /var/lib/snapshot-backup and the backup metadata and segments will be uploaded in the container mongodb-backup-prod with the name mongod-ops2.
Execute a file system backup using lvm snapshot:
$ sudo freezerc --lvm-srcvol /dev/jenkins/jenkins-home --lvm-dirmount
/var/snapshot-backup --lvm-volgroup jenkins
--file-to-backup /var/snapshot-backup --container freezer_jenkins-backup-prod
--exclude "\*.lock" --mode fs --backup-name jenkins-ops2
MySQL backup require a basic configuration file. The following is an example of the config:
$ sudo cat /root/.freezer/db.conf
host = your.mysql.host.ip
user = backup
password = userpassword
Every listed option is mandatory. There's no need to stop the mysql service before the backup execution.
Execute a MySQL backup using lvm snapshot:
$ sudo freezerc --lvm-srcvol /dev/mysqlvg/mysqlvol
--lvm-dirmount /var/snapshot-backup
--lvm-volgroup mysqlvg --file-to-backup /var/snapshot-backup
--mysql-conf /root/.freezer/freezer-mysql.conf--container
freezer_mysql-backup-prod --mode mysql --backup-name mysql-ops002
Cinder backups
To make a cinder backup you should provide cinder-vol-id or cindernative-vol-id parameter in command line arguments. Freezer doesn't do any additional checks and assumes that making a backup of that image will be sufficient to restore your data in future.
Execute a cinder backup:
$ freezerc --cinder-vol-id 3ad7a62f-217a-48cd-a861-43ec0a04a78bExecute a mysql backup with cinder:
$ freezerc --mysql-conf /root/.freezer/freezer-mysql.conf
--container freezer_mysql-backup-prod --mode mysql
--backup-name mysql-ops002
--cinder-vol-id 3ad7a62f-217a-48cd-a861-43ec0a04a78b
Nova backups
To make a nova backup you should provide a nova parameter in the arguments. Freezer doesn't do any additional checks and assumes that making a backup of that instance will be sufficient to restore your data in future.
Execute a nova backup:
$ freezerc --nova-inst-id 3ad7a62f-217a-48cd-a861-43ec0a04a78bExecute a mysql backup with nova:
$ freezerc --mysql-conf /root/.freezer/freezer-mysql.conf
--container freezer_mysql-backup-prod --mode mysql
--backup-name mysql-ops002
--nova-inst-id 3ad7a62f-217a-48cd-a861-43ec0a04a78b
All the freezerc activities are logged into /var/log/freezer.log.
Swift, Local and SSH Storage
Freezer can use:
local storage - folder that is available in the same OS (may be mounted)
To use local storage specify "--storage local" And use "--container %path-to-folder-with-backups%" Backup example:
$ sudo freezerc --file-to-backup /data/dir/to/backup
--container /tmp/my_backup_path/ --backup-name my-backup-name
--storage local
Restore example:
$ sudo freezerc --action restore --restore-abs-path /data/dir/to/backup
--container /tmp/my_backup_path/ --backup-name my-backup-name
--storage local
swift storage - OS object storage
To use swift storage specify "--storage swift" or skip "--storage" parameter at all. And use "--container %swift-container-name%"
Backup example:
$ sudo freezerc --file-to-backup /data/dir/to/backup
--container freezer-container --backup-name my-backup-name
--storage swift
Restore example:
$ sudo freezerc --action restore --restore-abs-path /data/dir/to/backup
--container freezer-container --backup-name my-backup-name
--storage swift
ssh storage - folder on remote machine
To use ssh storage specify "--storage ssh" And use "--container %path-to-folder-with-backups-on-remote-machine%" Also you should specify ssh-username, ssh-key and ssh-host parameters. ssh-port is optional parameter, default is 22.
ssh-username for user ubuntu should be "--ssh-username ubuntu" ssh-key should be path to your secret ssh key "--ssh-key %path-to-secret-key%" ssh-host can be ip of remote machine or resolvable dns name "--ssh-host 8.8.8.8"
Backup example:
$ sudo freezerc --file-to-backup /data/dir/to/backup
--container /remote-machine-path/ --backup-name my-backup-name
--storage ssh --ssh-username ubuntu --ssh-key ~/.ssh/id_rsa
--ssh-host 8.8.8.8
Restore example:
$ sudo freezerc  --action restore --restore-abs-pat /data/dir/to/backup
--container /remote-machine-path/ --backup-name my-backup-name
--storage ssh --ssh-username ubuntu --ssh-key ~/.ssh/id_rsa
--ssh-host 8.8.8.8
Note ssh keys with passphrase are not supported at the moment. Restore -------
As a general rule, when you execute a restore, the application that writes or reads data should be stopped.
There are 3 main options that need to be set for data restore
File System Restore:
Execute a file system restore of the backup name adminui.git:
$ sudo freezerc --action restore --container freezer_foobar-container-2
--backup-name adminui.git
--hostname git-HP-DL380-host-001 --restore-abs-path
/home/git/repositories/adminui.git/
--restore-from-date "2014-05-23T23:23:23"
MySQL restore:
Execute a MySQL restore of the backup name holly-mysql. Let's stop mysql service first:
$ sudo service mysql stopExecute Restore:
$ sudo freezerc --action restore --container freezer_foobar-container-2
--backup-name mysq-prod --hostname db-HP-DL380-host-001
--restore-abs-path /var/lib/mysql --restore-from-date "2014-05-23T23:23:23"
And finally restart mysql:
$ sudo service mysql startExecute a MongoDB restore of the backup name mongobigdata:
$ sudo freezerc --action restore --container freezer_foobar-container-2
--backup-name mongobigdata --hostname db-HP-DL380-host-001
--restore-abs-path /var/lib/mongo --restore-from-date "2014-05-23T23:23:23"
List remote containers:
$ sudo freezerc --action infoList remote objects in container:
$ sudo freezerc --action info --container freezer_testcontainer -lRemove backups older than a date:
$ freezer-agent --action admin --container freezer_dev-test --remove-before-date 2016-07-11T00:00:00 --backup-name dev-test-01Cinder restore currently creates a volume with the contents of the saved one, but doesn't implement deattach of existing volume and attach of the new one to the vm. You should implement these steps manually. To create a new volume from existing content run next command:
Execute a cinder restore:
$ freezerc --action restore --cinder-inst-id 3ad7a62f-217a-48cd-a861-43ec0a04a78b
$ freezerc --action restore --cindernative-vol-id 3ad7a62f-217a-48cd-a861-43ec0a04a78b
Nova restore currently creates an instance with the content of saved one, but the ip address of the vm will be different as well as it's id.
Execute a nova restore:
$ freezerc --action restore --nova-inst-id 3ad7a62f-217a-48cd-a861-43ec0a04a78bLocal storage restore execution:
$ sudo freezerc --action restore --container /local_backup_storage/ --backup-name adminui.git --hostname git-HP-DL380-host-001 --restore-abs-path /home/git/repositories/adminui.git/ --restore-from-date "2014-05-23T23:23:23" --storage local
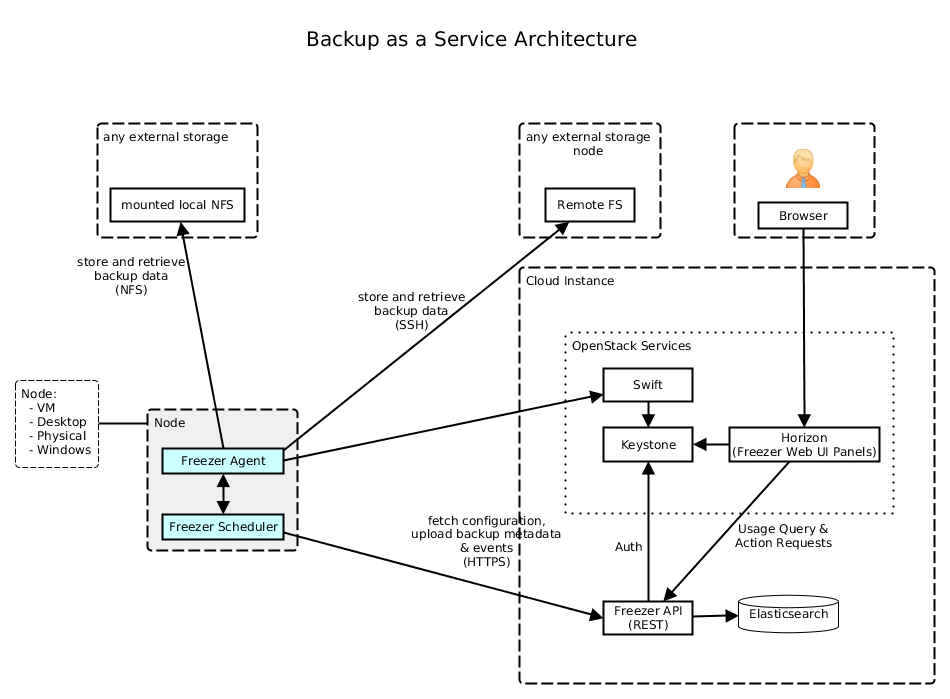
Architecture
Freezer architectural components are the following:
- OpenStack Swift (the storage)
- freezer client running on the node where you want to execute the backups or restore
Freezer uses GNU Tar under the hood to execute incremental backup and restore. When a key is provided, it uses OpenSSL to encrypt data. (AES-256-CFB)
Freezer components.
| Component | Description |
|---|---|
| Freezer Web UI | Web interface that interacts with the Freezer API to configure and change settings. It provides most of the features from the freezerc CLI, advanced scheduler settings such as multi-node backup synchronization, metrics, and reporting. |
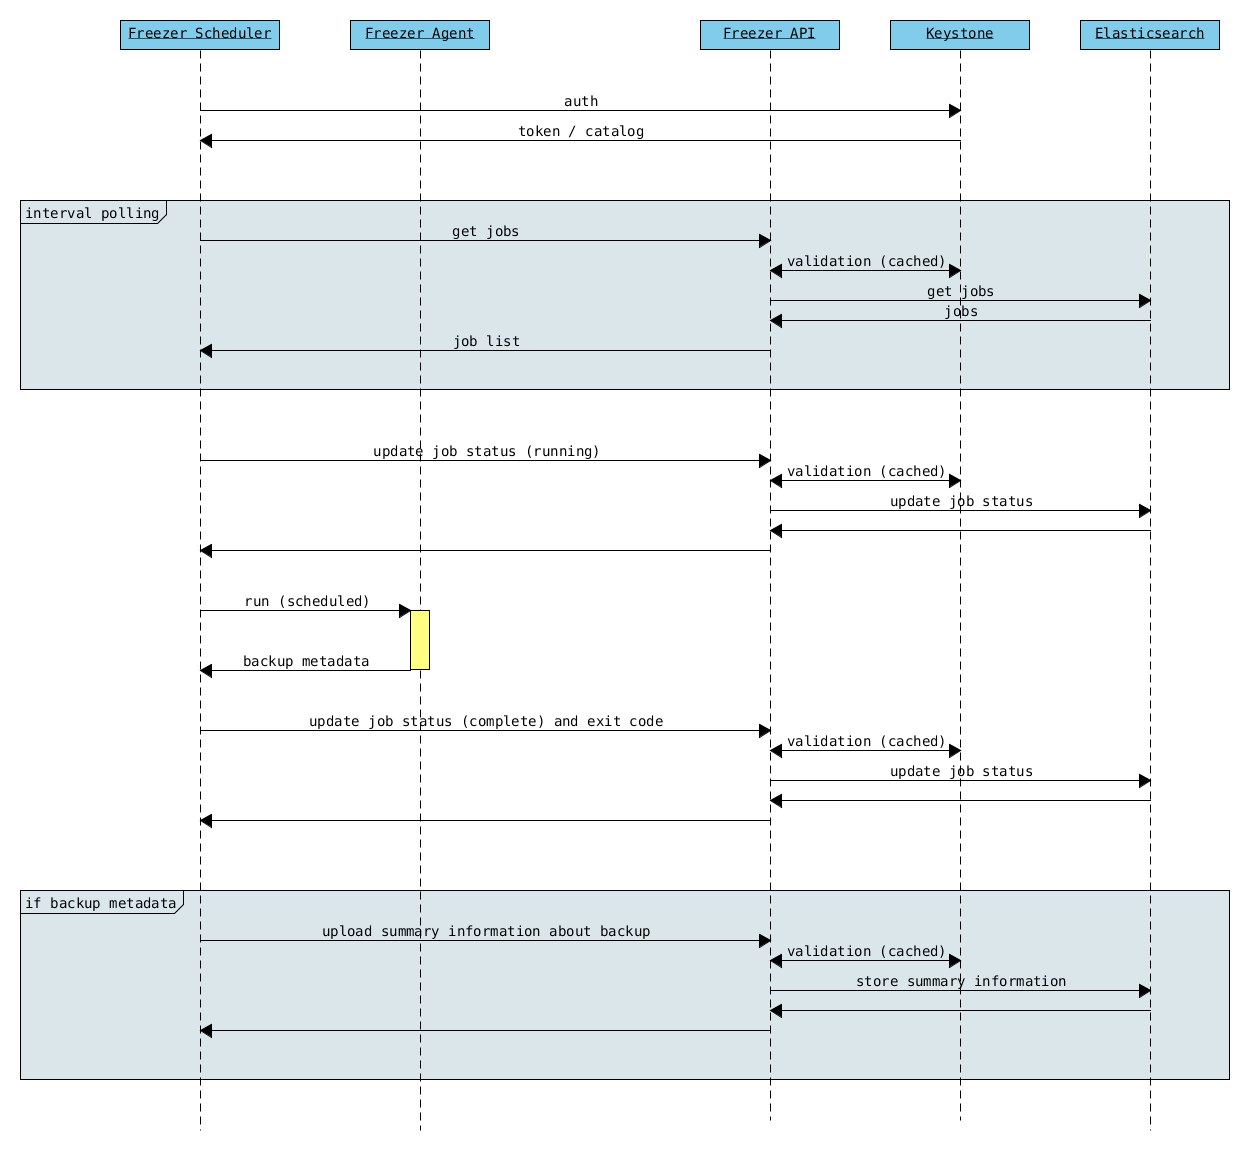
| Freezer Scheduler | A client side component, running on the node where the data backup is to be executed. It consists of a daemon that retrieves the data from the freezer API and executes jobs (i.e. backups, restore, admin actions, info actions, pre and/or post job scripts) by running the Freezer Agent. The metrics and exit codes returned by the freezer agent are captured and sent to the Freezer API. The scheduler manages the execution and synchronization of multiple jobs executed on a single or multiple nodes. The status of the execution of all the nodes is saved through the API. The Freezer scheduler takes care of uploading jobs to the API by reading job files on the file system. It also has its own configuration file where job session or other settings like the freezer API polling interval can be configured. The Freezer scheduler manages jobs, for more information about jobs please refer to: freezer_api/README.rst under JOB the sections |
| Freezer Agent | Multiprocessing Python software that runs on the client side, where the data backup is to be executed. It can be executed standalone or by the Freezer Scheduler. The freezerc provides a flexible way to execute backup, restore and other actions on a running system. In order to provide flexibility in terms of data integrity, speed, performance, resources usage, etc the freezer agent offers a wide range of options to execute optimized backup according the available resources as:
|
| Freezer API | The API is used to store and provide metadata to the Freezer Web UI and to the Freezer Scheduler. Also the API is used to store session information for multi node backup synchronization. No workload data is stored in the API. For more information to the API please refer to: freezer_api/README.rst |
| DB Elasticsearch | Backend used by the API to store and retrieve metrics, metadata sessions information, job status, etc. |
Freezer currently uses GNU Tar under the hood to execute incremental backup and restore. When a key is provided, it uses OpenSSL to encrypt data (AES-256-CFB).
The following diagrams can help to better understand the solution:
Service Architecture
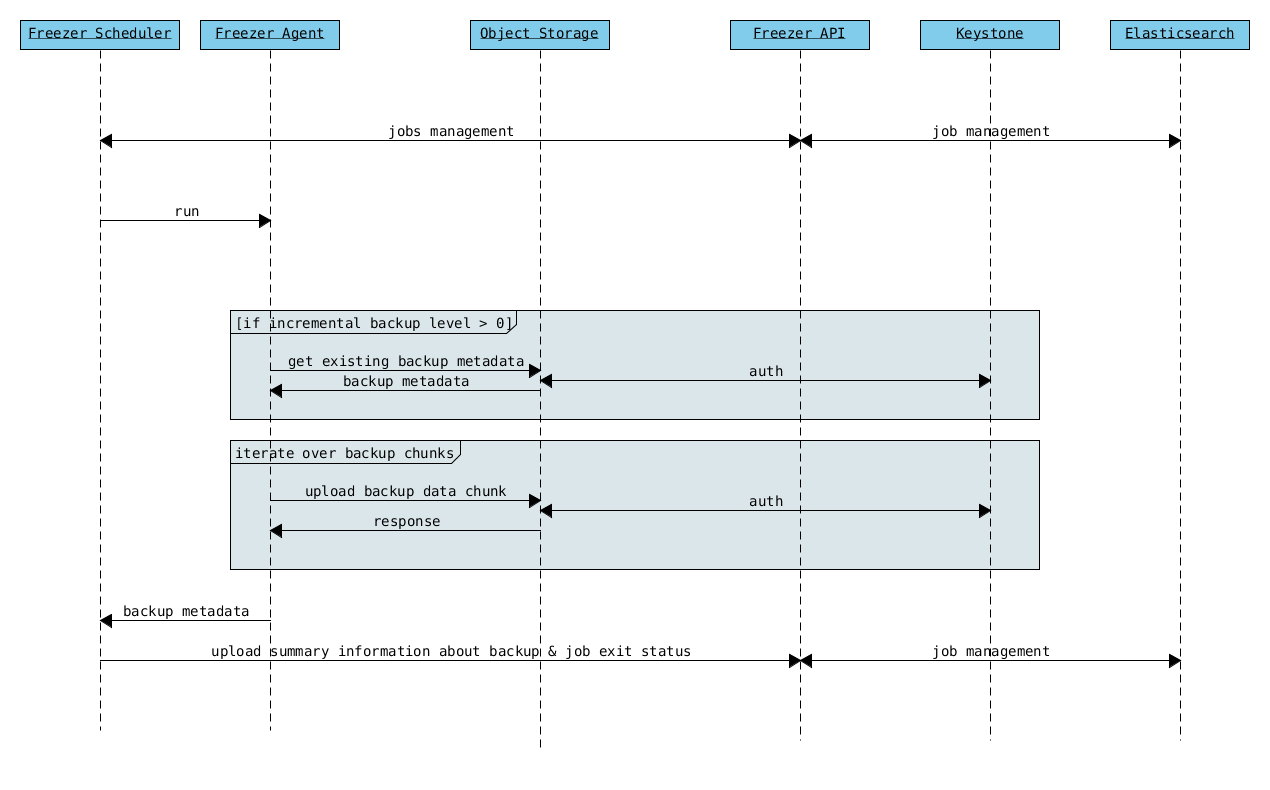
Freezer Agent backup work flow with API
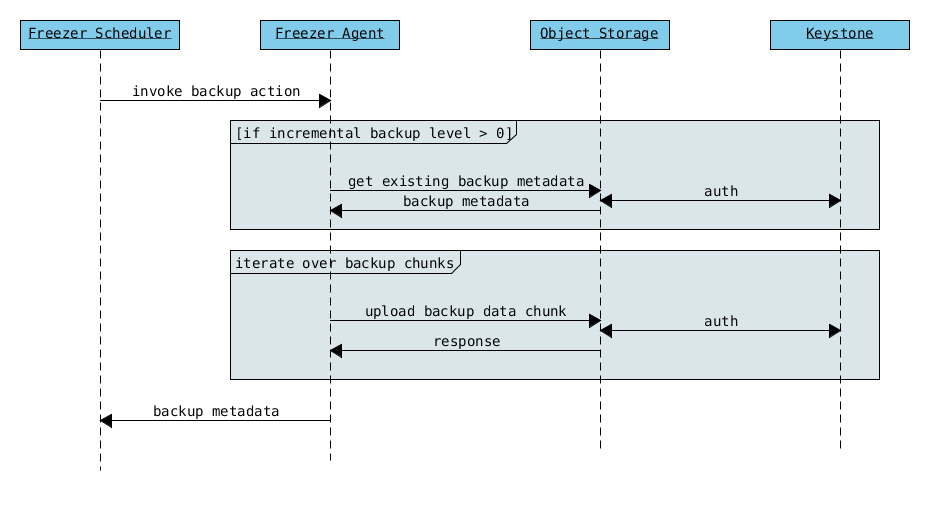
Freezer Agent backup without API
Freezer Scheduler with API
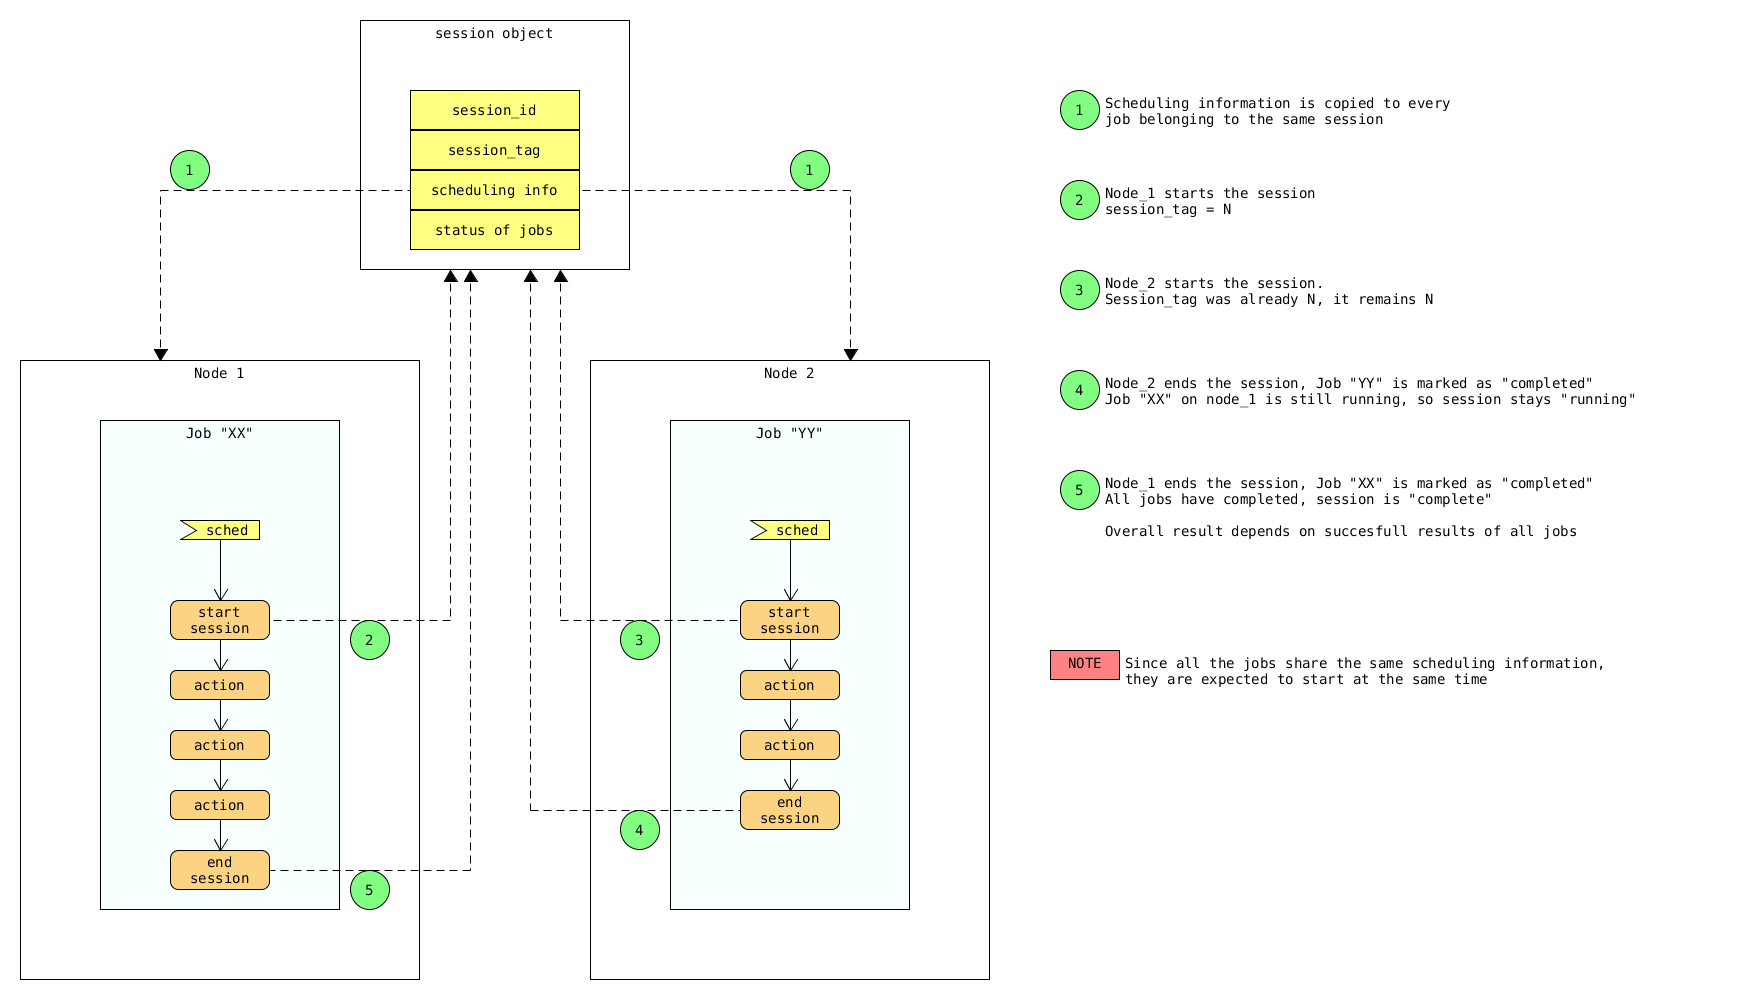
Freezer Job Session
Freezer Dashboard
How to scale
Low resources requirement
Freezer is designed to reduce to the minimum I/O, CPU and Memory Usage. This is achieved by generating a data stream from tar (for archiving) and gzip (for compressing). Freezer segments the stream in a configurable chunk size (with the option --max-seg-size). The default segment size is 64MB, so it can be safely stored in memory, encrypted if the key is provided, and uploaded to Swift as a segment.
Multiple segments are sequentially uploaded using the Swift Manifest. All the segments are uploaded first, and then the Manifest file is uploaded too, so the data segments cannot be accessed directly. This ensures data consistency.
By keeping the segments small, in-memory, I/O usage is reduced. Also as there's no need to store locally the final compressed archive (tar-gziped), no additional or dedicated storage is required for the backup execution. The only additional storage needed is the LVM snapshot size (set by default at 5GB). The lvm snapshot size can be set with the option --lvm-snapsize. It is important to not specify a too small snapshot size, because in case a quantity of data is being written to the source volume and consequently the lvm snapshot is filled up, then the data is corrupted.
If more memory is available for the backup process, the maximum segment size can be increased. This will speed up the process. Please note that the segments must be smaller then 5GB, since that is the maximum object size in the Swift server.
On the other hand, if a server has small memory availability, the --max-seg-size option can be set to lower values. The unit of this option is in bytes.
How the incremental works
The incremental backups is one of the most crucial features. The following basic logic happens when Freezer executes:
- Freezer starts the execution and checks if the provided backup name for the current node already exists in Swift.
- If the backup exists, then the Manifest file is retrieved. This is important as the Manifest file contains the information of the previous Freezer execution.
Nova and Cinder Backups
If our data is stored on cinder volume or nova instance disk, we can implement file backup using nova snapshots or volume backups.
Nova backups:
If you provide nova argument in parameters, freezer assumes that all necessary data is located on instance disk and it can be successfully stored using nova snapshot mechanism.
For example if we want to store our mysql located on instance disk, we will execute the same actions like in the case of lvm or tar snapshots, but we will invoke nova snapshot instead of lvm or tar.
After that we will place snapshot to swift container as dynamic large object.
container/%instance_id%/%timestamp% <- large object with metadata container_segments/%instance_id%/%timestamp%/segments...
Restore will create a snapshot from stored data and restore an instance from this snapshot. Instance will have different id and old instance should be terminated manually.
Cinder backups:
Cinder has its own mechanism for backups, and freezer supports it. But it also allows creating a glance image from volume and uploading to swift.
To use standard cinder backups please provide --cindernative-vol-id argument.
Parallel backup
Parallel backup can be executed only by config file. In config file you should create n additional sections that start with "storage:"
Example [storage:my_storage1], [storage:ssh], [storage:storage3]
Each storage section should have 'container' argument and all parameters related to the storage
Example: ssh-username, ssh-port
For swift storage you should provide additional parameter called 'osrc' Osrc should be a path to file with Openstack Credentials like:
unset OS_DOMAIN_NAME export OS_AUTH_URL=http://url:5000/v3 export OS_PROJECT_NAME=project_name export OS_USERNAME=username export OS_PASSWORD=secret_password export OS_PROJECT_DOMAIN_NAME=Default export OS_USER_DOMAIN_NAME=Default export OS_IDENTITY_API_VERSION=3 export OS_AUTH_VERSION=3 export OS_CACERT=/etc/ssl/certs/ca-certificates.crt export OS_ENDPOINT_TYPE=internalURL
Example of Config file for two local storages and one swift storage:
[default] action = backup mode = fs path_to_backup = /foo/ backup_name = mytest6 always_level = 2 max_segment_size = 67108864 container = /tmp/backup/ storage = local [storage:first] storage=local container = /tmp/backup1/ [storage:second] storage=local container = /tmp/backup2/ [storage:swift] storage=swift container = test osrc = openrc.osrc
freezer-scheduler
The freezer-scheduler is one of the two freezer components which is run on the client nodes; the other one being the freezer-agent. It has a double role: it is used both to start the scheduler process, and as a cli-tool which allows the user to interact with the API.
The freezer-scheduler process can be started/stopped in daemon mode using the usual positional arguments:
freezer-scheduler start|stopIt can be also be started as a foreground process using the --no-daemon flag:
freezer-scheduler --no-daemon startThis can be useful for testing purposes, when launched in a Docker container, or by a babysitting process such as systemd.
The cli-tool version is used to manage the jobs in the API. A "job" is basically a container; a document which contains one or more "actions". An action contains the instructions for the freezer-agent. They are the same parameters that would be passed to the agent on the command line. For example: "backup_name", "path_to_backup", "max_level"
To sum it up, a job is a sequence of parameters that the scheduler pulls from the API and passes to a newly spawned freezer-agent process at the right time.
The scheduler understands the "scheduling" part of the job document, which it uses to actually schedule the job, while the rest of the parameters are substantially opaque.
It may also be useful to use the "-c" parameter to specify the client-id that the scheduler will use when interacting with the API.
The purpose of the client-id is to associate a job with the scheduler instance which is supposed to execute that job.
A single openstack user could manage different resources on different nodes (and actually may even have different freezer-scheduler instances running on the same node with different local privileges, for example), and the client-id allows him to associate the specific scheduler instance with its specific jobs.
When not provided with a custom client-id, the scheduler falls back to the default which is composed from the tenant-id and the hostname of the machine on which it is running.
The first step to use the scheduler is creating a document with the job:
cat test_job.json

{
  "job_actions": [
      {
          "freezer_action": {
              "action": "backup",
              "mode": "fs",
              "backup_name": "backup1",
              "path_to_backup": "/home/me/datadir",
              "container": "schedule_backups",
              "log_file": "/home/me/.freezer/freezer.log"
          },
          "max_retries": 3,
          "max_retries_interval": 60
      }
  ],
  "job_schedule": {
      "schedule_interval": "4 hours",
      "schedule_start_date": "2015-08-16T17:58:00"
  },
  "description": "schedule_backups 6"
}
Then upload that job into the API:
freezer-scheduler -c node12 job-create --file test_job.jsonThe newly created job can be found with:
freezer-scheduler -c node12 job-list

+----------------------------------+--------------------+-----------+--------+-------+--------+------------+
|              job_id              |    description     | # actions | status | event | result | session_id |
+----------------------------------+--------------------+-----------+--------+-------+--------+------------+
| 07999ea33a494ccf84590191d6fe850c | schedule_backups 6 |     1     |        |       |        |            |
+----------------------------------+--------------------+-----------+--------+-------+--------+------------+
Its content can be read with:
freezer-scheduler -c node12 job-get -j 07999ea33a494ccf84590191d6fe850cThe scheduler can be started on the target node with:
freezer-scheduler -c node12 -i 15 -f ~/job_dir startThe scheduler could have already been started. As soon as the freezer-scheduler contacts the API, it fetches the job and schedules it.
Misc
Dependencies notes
In stable/kilo and stable/liberty the module peppep3134daemon is imported from local path rather than pip. This generated many issues as the package is not in the global-requirements.txt of kilo and liberty. Also pbr in the kilo release does not support env markers which further complicated the installation.
Please check the FAQ to: FAQ.rst
Scheduler Options
To get an updated sample of freezer-scheduler configuration you the following command:
oslo-config-generator --config-file config-generator/scheduler.confyou will find the update sample file in etc/scheduler.conf.sample
Agent Options
To list options available in freezer-agent use the following command:
oslo-config-generator --namespace freezer --namespace oslo.logthis will print all options to the screen you direct the output to a file if you want:
oslo-config-generator --namespace freezer --namespace oslo.log --output-file etc/agent.conf.sampleBandwidth limitation (Trickle)
Trickle for bandwidth limiting ( How it works ): We have 3 cases to handle 1- User used --upload-limit or --download-limit from the cli We need to remove these limits from the cli arguments and then run trickle using subprocess
EX:
# freezer-agent --action backup -F /etc/ -C freezer --upload-limit = 1kthis will be translated to:
# trickle -u 1024 -d -1 freezer-agent --action backup -F /etc/ -C freezer2- User used config files to execute an action
We need to create a new config file without the limits So we will get the all the arguments provided and remove limits then run trickle using subprocess
EX: We have a config file contains:
[default]
action = backup
storage = ssh
ssh_host = 127.0.0.1
ssh_username = saad
ssh_key = /home/saad/.ssh/saad
container = /home/saad/backups_freezers
backup_name = freezer_jobs
path_to_backup = /etc
upload_limit=2k
download_limit=1k
and we are going to execute this job as follow:
freezer-agent --config /home/user/job1.inithis will be translated to:
trickle -u 2048 -d 1024 freezer-agent --config /tmp/freezer_job_x21aj29The new config file has the following arguments:
[default]
action = backup
storage = ssh
ssh_host = 127.0.0.1
ssh_username = saad
ssh_key = /home/saad/.ssh/saad
container = /home/saad/backups_freezers
backup_name = freezer_jobs
path_to_backup = /etc
3- Hybrid using config file and cli options we will use a mix of both procedures: - remove limits (cli or config ) - reproduce the same command again with trickle EX:
$ freezer-agent --config /home/user/job2.ini --upload-limit 1kThe Freezer logo is released under the licence Attribution 3.0 Unported (CC BY3.0).