As is, the variables.sh file will clobber envvars. Don't do that anymore. Change-Id: I6afc0eb354c19ebc96fc51f0dcf06d89aa3cabfe |
||
|---|---|---|
| .. | ||
| screenshots | ||
| templates | ||
| tools | ||
| build.sh | ||
| deploy-osa.sh | ||
| deploy-vms.sh | ||
| functions.rc | ||
| hosts.json | ||
| LICENSE.txt | ||
| openstack-service-setup.sh | ||
| README.rst | ||
| setup-cobbler.sh | ||
| setup-host.sh | ||
| setup-virsh-net.sh | ||
| variables.sh | ||
OpenStack-Ansible Multi-Node AIO
- date
-
2016-03-09
- tags
-
rackspace, openstack, ansible
- category
-
*openstack, *nix
About this repository
Full OpenStack deployment using a single OnMetal host from the Rackspace Public Cloud. This is a multi-node installation using VMs that have been PXE booted which was done to provide an environment that is almost exactly what is in production. This script will build, kick and deploy OpenStack using KVM, Cobbler, OpenStack-Ansible within 13 Nodes and 1 load balancer all using a Hyper Converged environment.
Process
Create at least one physical host that has public network access and
is running the Ubuntu 14.04 LTS (Trusty Tahr) Operating system. This
script assumes that you have an unpartitioned device with at least 1TB
of storage. If you're using the Rackspace OnMetal servers the drive
partitioning will be done for you by detecting the largest unpartitioned
device. If you're doing the deployment on something other than a
Rackspace OnMetal server you may need to modify the
setup-host.sh script to do the needful in your environment.
If you know the device name you want to format you can also set the
${DATA_DISK_DEVICE} variable accordingly.
Physical disk partitioning can be skipped by setting
PARTITION_HOST=false. If you set this, make sure you have
enough space available to run all of the infrastructure VMs within
/var/lib/libvirt/images.
| Physical Host Specs known to work well |
|---|
|
| =========== ======== ============ |
|
These specs are covered by the Rackspace OnMetal-IO v1/2 Servers.
When your ready, run the build script by executing
bash ./build.sh. The build script current executes a
deployment of OpenStack Ansible using the master branch. If you want to
do something other than deploy master you can set the
${OSA_BRANCH} variable to any branch, tag, or SHA.
Post Deployment
Once deployed you can use virt-manager to manage the KVM instances on the host, similar to a DRAC or ILO.
- LINUX:
-
If you're running a linux system as your workstation simply install virt-manager from your package manager and connect to the host via QEMU/KVM:SSH
- OSX:
-
If you're running a MAC you can get virt-manager via X11 forwarding to the host or install it via BREW. http://stackoverflow.com/questions/3921814/is-there-a-virt-manager-alternative-for-mac-os-x
- WINDOWS:
-
If you're running Windows, you can install virt-viewer from the KVM Download site. https://virt-manager.org/download/
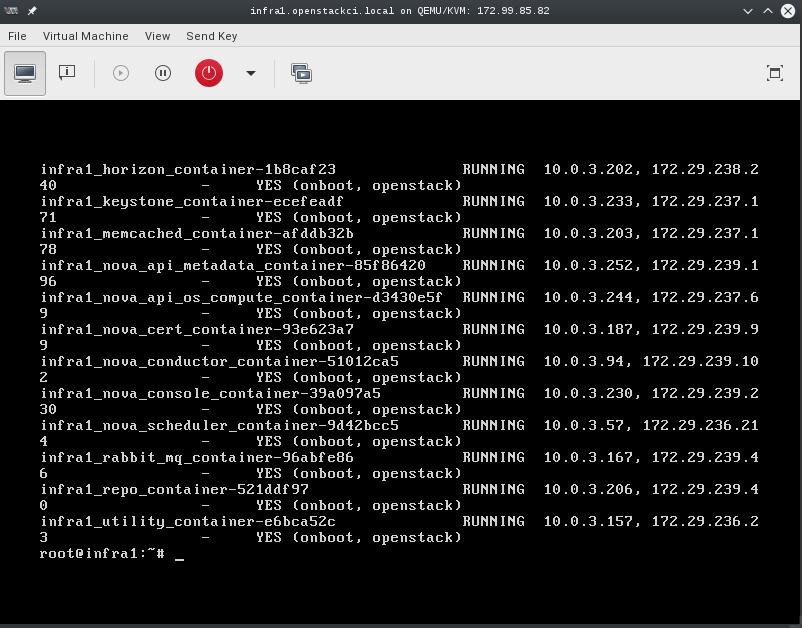
Deployment screenshot
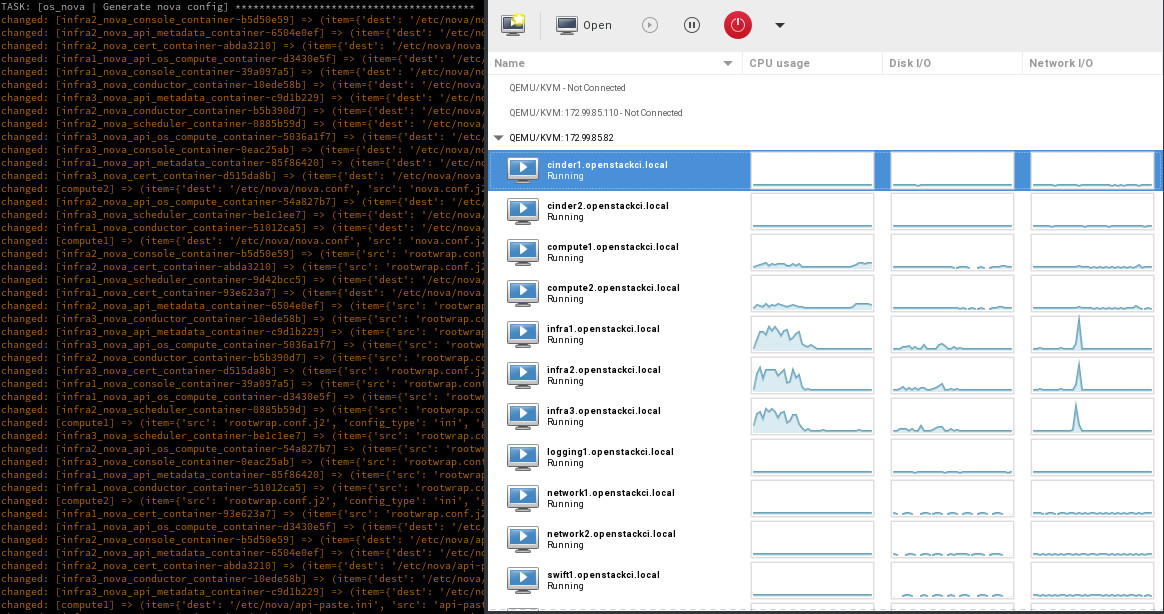
Deployments can be accessed and monitored via virt-manager
Console Access
The root password for all VMs is "cobbler". This password is being set within the pre-seed files under the "Users and Password" section. If you want to change this password please edit the pre-seed files.
Notes
- The cobbler and pre-seed setup has been implemented using some of the awesome work originally created by James Thorne.
-
- cobbler installation post - https://thornelabs.net/2015/11/26/install-and-configure-cobbler-on-ubuntu-1404.html
- pre-seeds -- https://github.com/jameswthorne/preseeds
Options
- Set the default preseed device name. This is being set because sda is on hosts, vda is kvm, xvda is xen:
-
DEVICE_NAME="${DEVICE_NAME:-vda}" - Set to instruct the preseed what the default network is expected to be:
-
DEFAULT_NETWORK="${DEFAULT_NETWORK:-eth0}" - Set the data disk device, if unset the largest unpartitioned device will be used to for host VMs:
-
DATA_DISK_DEVICE="${DATA_DISK_DEVICE:-$(lsblk -brndo NAME,TYPE,FSTYPE,RO,SIZE | awk '/d[b-z]+ disk +0/{ if ($4>m){m=$4; d=$1}}; END{print d}')}" - Set the VM disk size in gigabytes:
-
VM_DISK_SIZE="${VM_DISK_SIZE:-252}" - Set the OSA branch for this script to deploy:
-
OSA_BRANCH=${OSA_BRANCH:-master} - Enable partitioning of the "${DATA_DISK_DEVICE}":
-
PARTITION_HOST=${PARTITION_HOST:-true} - Instruct the system to deploy OpenStack Ansible:
-
DEPLOY_OSA=${DEPLOY_OSA:-true} - Instruct the system to Kick all of the VMs:
-
DEPLOY_VMS=${DEPLOY_VMS:-true} - Instruct the system to run VM disk image create:
-
VM_IMAGE_CREATE=${VM_IMAGE_CREATE:-true} - Instruct the system do all of the require host setup:
-
SETUP_HOST=${SETUP_HOST:-true} - Instruct the system do all of the cobbler setup:
-
SETUP_COBBLER=${SETUP_COBBLER:-true} - Instruct the system do all of the virsh network setup:
-
SETUP_VIRSH_NET=${SETUP_VIRSH_NET:-true} - Instruct the system to pre-config the envs for running OSA playbooks:
-
PRE_CONFIG_OSA=${PRE_CONFIG_OSA:-true} - Instruct the system to run the OSA playbooks, if you want to deploy other OSA powered cloud, you can set it to false:
-
RUN_OSA=${RUN_OSA:-true} - Instruct the VM to use the selected image, eg. ubuntu xenial:
-
DEFAULT_IMAGE=${DEFAULT_IMAGE:-16.04} - Install the specified kernel, eg 3.13.0-34 if you want to deploy Juno release.
-
DEFAULT_KERNEL=${DEFAULT_KERNEL:-3.13.0-34}
Re-kicking the VMs
The build process will add a function to the system to provide you a
quick means to re-kick a VM host. The function added is
rekick_vms. This function can be used to re-kick a specific
host. To use this function use the short hostname along with the
function. EXAMPLE: rekick_vms infra1. This command will
destroy the root disk for the VM and reboot it causing it to be re-PXE
booted. Once the re-deployment has completed (<=10 min) the node will
have a vanilla OS.
If you want to re-kick all known hosts you can execute the
deploy-vms.sh script which will do everything needed to
boot all new VMs paving over the existing ones.
Adding nodes to the deployment
To add nodes to the deployment simply add the node entries to the
hosts.json file. The file divides nodes by type and you can add more
nodes to any of the available types without any modifications made to
the templates or build script. The first 100 IP address of all used
CIDRs have been reserved in the openstack_user_config.yml
and can be used when adding additional hosts to the environment.
Rerunning the build script
The build script can be rerun at any time. If you have a successful run before and simply want to re-kick everything I recommend nuking the running VMs and then executing the build script instructing it to NOT partition the host. This can be easily done using the following snippet.
for i in $(virsh list --all --name); do virsh destroy $i; virsh undefine $i; rm /var/lib/libvirt/images/$i.img; done
rm ~/.ssh/known_hosts; PARTITION_HOST=false ./build.sh
Deploying OpenStack into the environment
While the build script will deploy OpenStack, you can choose to run this manually. To run a basic deploy using a given branch you can use the following snippet.
OSA_BRANCH=master ./deploy-osa.shSnapshotting an environment before major testing
Running a snapshot on all of the vms before doing major testing is
wise as it'll give you a restore point without having to re-kick the
cloud. You can do this using some basic virsh commands and
a little bash.
for instance in $(virsh list --all --name); do
  virsh snapshot-create-as --atomic --name $instance-kilo-snap --description "saved kilo state before liberty upgrade" $instance
done
Once the previous command is complete you'll have a collection of
snapshots within all of your infrastructure hosts. These snapshots can
be used to restore state to a previous point if needed. To restore the
infrastructure hosts to a previous point, using your snapshots, you can
execute a simple virsh command or the following bash loop
to restore everything to a known point.
for instance in $(virsh list --all --name); do
  virsh snapshot-revert --snapshotname $instance-kilo-snap --running $instance
done