7.0 KiB
Manage volumes and volume types
Volumes are the Block Storage devices that you attach to instances to enable persistent storage. Users can attach a volume to a running instance or detach a volume and attach it to another instance at any time. For information about using the dashboard to create and manage volumes as an end user, see the OpenStack End User Guide.
As an administrative user, you can manage volumes and volume types for users in various projects. You can create and delete volume types, and you can view and delete volumes. Note that a volume can be encrypted by using the steps outlined below.
Create a volume type
- Log in to the dashboard and select the
adminproject from the drop-down list. - On the
Admintab, open theSystemtab and click theVolumescategory. - Click the
Volume Typestab, and clickCreate Volume Typebutton. In theCreate Volume Typewindow, enter a name for the volume type. - Click
Create Volume Typebutton to confirm your changes.
Note
A message indicates whether the action succeeded.
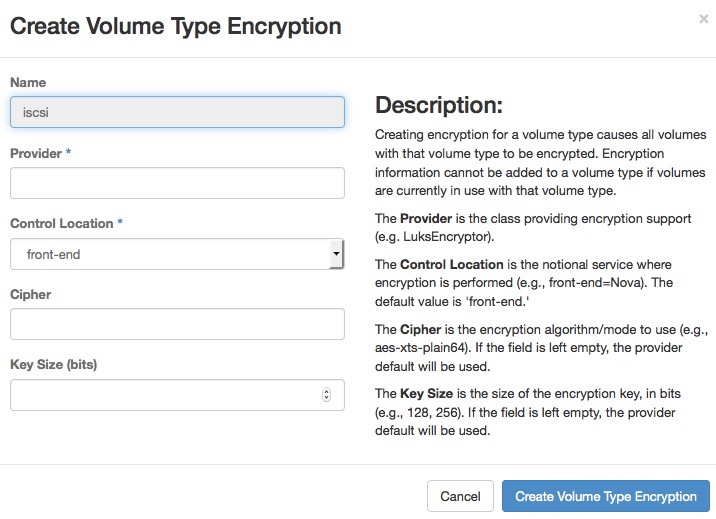
Create an encrypted volume type
- Create a volume type using the steps above for
create-a-volume-type. - Click
Create Encryptionin the Actions column of the newly created volume type. - Configure the encrypted volume by setting the parameters below from
available options (see table):
- Provider
-
Specifies the class responsible for configuring the encryption.
- Control Location
-
Specifies whether the encryption is from the front end (nova) or the back end (cinder).
- Cipher
-
Specifies the encryption algorithm.
- Key Size (bits)
-
Specifies the encryption key size.
- Click
Create Volume Type Encryption.
The table below provides a few alternatives available for creating encrypted volumes.
| Encryption parameters | Parameter options | Comments |
|---|---|---|
|
nova.volume.encryptors. luks.LuksEncryptor (Recommended) | Allows easier import and migration of imported encrypted volumes, and allows access key to be changed without re-encrypting the volume |
+ +-----------------------+----------------------------+ | Less disk overhead than | | LUKS | | | +--------------------+-----------------------+----------------------------+ | Control Location | front-end | | (Recommended) | | | | | | | | + +-----------------------+----------------------------+ | | back-end | | | | | | | | | | | | | | | | +--------------------+-----------------------+----------------------------+ | Cipher | aes-xts-plain64 | | (Recommended) + +-----------------------+----------------------------+ | | aes-cbc-essiv | | | | +--------------------+-----------------------+----------------------------+ | Key Size (bits)| 512 (Recommended for | | aes-xts-plain64. 256 | | should be used for | | aes-cbc-essiv) | | + +-----------------------+----------------------------+ | | 256 | | | | +--------------------+-----------------------+----------------------------+
* Source NIST SP 800-38E
Delete volume types
When you delete a volume type, volumes of that type are not deleted.
- Log in to the dashboard and select the
adminproject from the drop-down list. - On the
Admintab, open theSystemtab and click theVolumescategory. - Click the
Volume Typestab, select the volume type or types that you want to delete. - Click
Delete Volume Typesbutton. - In the
Confirm Delete Volume Typeswindow, click theDelete Volume Typesbutton to confirm the action.
Note
A message indicates whether the action succeeded.
Delete volumes
When you delete an instance, the data of its attached volumes is not destroyed.
- Log in to the dashboard and select the
adminproject from the drop-down list. - On the
Admintab, open theSystemtab and click theVolumescategory. - Select the volume or volumes that you want to delete.
- Click
Delete Volumesbutton. - In the
Confirm Delete Volumeswindow, click theDelete Volumesbutton to confirm the action.
Note
A message indicates whether the action succeeded.