* replace 1., 2., .. with #. where possible
* replace a., b., .. with *
* flatten some lists

Change-Id: Icdae64a44fee7911022331081c07d717d797506e
Implements: blueprint installguide-liberty
12 KiB
Install and configure
This section describes how to install and configure the Image service, code-named glance, on the controller node. For simplicity, this configuration stores images on the local file system.
obs or rdo or ubuntu
Prerequisites
Before you install and configure the Image service, you must create a database, service credentials, and API endpoints.
To create the database, complete these steps:
Use the database access client to connect to the database server as the
rootuser:$ mysql -u root -pCreate the
glancedatabase:CREATE DATABASE glance;Grant proper access to the
glancedatabase:GRANT ALL PRIVILEGES ON glance.* TO 'glance'@'localhost' \ IDENTIFIED BY 'GLANCE_DBPASS'; GRANT ALL PRIVILEGES ON glance.* TO 'glance'@'%' \ IDENTIFIED BY 'GLANCE_DBPASS';Replace
GLANCE_DBPASSwith a suitable password.Exit the database access client.
Source the
admincredentials to gain access to admin-only CLI commands:$ source admin-openrc.shTo create the service credentials, complete these steps:
Create the
glanceuser:$ openstack user create --password-prompt glance User Password: Repeat User Password: +-----------+----------------------------------+ | Field | Value | +-----------+----------------------------------+ | domain_id | default | | enabled | True | | id | e38230eeff474607805b596c91fa15d9 | | name | glance | +-----------+----------------------------------+Add the
adminrole to theglanceuser andserviceproject:$ openstack role add --project service --user glance adminNote
This command provides no output.
Create the
glanceservice entity:$ openstack service create --name glance \ --description "OpenStack Image service" image +-------------+----------------------------------+ | Field | Value | +-------------+----------------------------------+ | description | OpenStack Image service | | enabled | True | | id | 8c2c7f1b9b5049ea9e63757b5533e6d2 | | name | glance | | type | image | +-------------+----------------------------------+
Create the Image service API endpoints:
$ openstack endpoint create --region RegionOne \
  image public http://controller:9292
+--------------+----------------------------------+
| Field        | Value                            |
+--------------+----------------------------------+
| enabled      | True                             |
| id           | 340be3625e9b4239a6415d034e98aace |
| interface    | public                           |
| region       | RegionOne                        |
| region_id    | RegionOne                        |
| service_id   | 8c2c7f1b9b5049ea9e63757b5533e6d2 |
| service_name | glance                           |
| service_type | image                            |
| url          | http://controller:9292           |
+--------------+----------------------------------+

$ openstack endpoint create --region RegionOne \
  image internal http://controller:9292
+--------------+----------------------------------+
| Field        | Value                            |
+--------------+----------------------------------+
| enabled      | True                             |
| id           | a6e4b153c2ae4c919eccfdbb7dceb5d2 |
| interface    | internal                         |
| region       | RegionOne                        |
| region_id    | RegionOne                        |
| service_id   | 8c2c7f1b9b5049ea9e63757b5533e6d2 |
| service_name | glance                           |
| service_type | image                            |
| url          | http://controller:9292           |
+--------------+----------------------------------+

$ openstack endpoint create --region RegionOne \
  image admin http://controller:9292
+--------------+----------------------------------+
| Field        | Value                            |
+--------------+----------------------------------+
| enabled      | True                             |
| id           | 0c37ed58103f4300a84ff125a539032d |
| interface    | admin                            |
| region       | RegionOne                        |
| region_id    | RegionOne                        |
| service_id   | 8c2c7f1b9b5049ea9e63757b5533e6d2 |
| service_name | glance                           |
| service_type | image                            |
| url          | http://controller:9292           |
+--------------+----------------------------------+
Install and configure components
obs or rdo or ubuntu
obs
Install the packages:
# zypper install openstack-glance python-glanceclient
rdo
Install the packages:
# yum install openstack-glance python-glance python-glanceclient
ubuntu
Install the packages:
# apt-get install glance python-glanceclient
obs or rdo or ubuntu
- Edit the
/etc/glance/glance-api.conffile and complete the following actions:In the
[database]section, configure database access:[database] ... connection = mysql+pymysql://glance:GLANCE_DBPASS@controller/glanceReplace
GLANCE_DBPASSwith the password you chose for the Image service database.In the
[keystone_authtoken]and[paste_deploy]sections, configure Identity service access:[keystone_authtoken] ... auth_uri = http://controller:5000 auth_url = http://controller:35357 auth_plugin = password project_domain_id = default user_domain_id = default project_name = service username = glance password = GLANCE_PASS [paste_deploy] ... flavor = keystoneReplace
GLANCE_PASSwith the password you chose for theglanceuser in the Identity service.Note
Comment out or remove any other options in the
[keystone_authtoken]section.In the
[glance_store]section, configure the local file system store and location of image files:[glance_store] ... default_store = file filesystem_store_datadir = /var/lib/glance/images/In the
[DEFAULT]section, configure thenoopnotification driver to disable notifications because they only pertain to the optional Telemetry service:[DEFAULT] ... notification_driver = noopThe Telemetry chapter provides an Image service configuration that enables notifications.
(Optional) To assist with troubleshooting, enable verbose logging in the
[DEFAULT]section:[DEFAULT] ... verbose = True
- Edit the
/etc/glance/glance-registry.conffile and complete the following actions:In the
[database]section, configure database access:[database] ... connection = mysql+pymysql://glance:GLANCE_DBPASS@controller/glanceReplace
GLANCE_DBPASSwith the password you chose for the Image service database.In the
[keystone_authtoken]and[paste_deploy]sections, configure Identity service access:[keystone_authtoken] ... auth_uri = http://controller:5000 auth_url = http://controller:35357 auth_plugin = password project_domain_id = default user_domain_id = default project_name = service username = glance password = GLANCE_PASS [paste_deploy] ... flavor = keystoneReplace
GLANCE_PASSwith the password you chose for theglanceuser in the Identity service.Note
Comment out or remove any other options in the
[keystone_authtoken]section.In the
[DEFAULT]section, configure thenoopnotification driver to disable notifications because they only pertain to the optional Telemetry service:[DEFAULT] ... notification_driver = noopThe Telemetry chapter provides an Image service configuration that enables notifications.
(Optional) To assist with troubleshooting, enable verbose logging in the
[DEFAULT]section:[DEFAULT] ... verbose = True
rdo or ubuntu
Populate the Image service database:
# su -s /bin/sh -c "glance-manage db_sync" glance
debian
Install the packages:
# apt-get install glance python-glanceclientRespond to prompts for
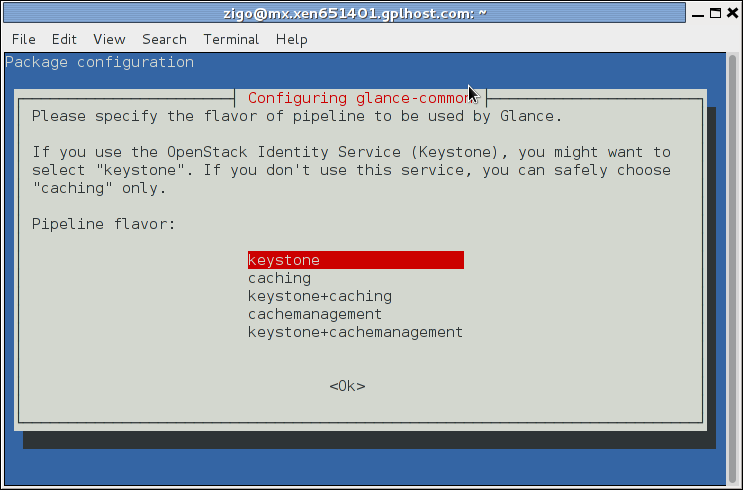
database management <debconf/debconf-dbconfig-common>,Identity service credentials <debconf/debconf-keystone-authtoken>,service endpoint registration <debconf/debconf-api-endpoints>, andmessage broker credentials <debconf/debconf-rabbitmq>.Select the
keystonepipeline to configure the Image service to use the Identity service:
Finalize installation
obs or rdo
Start the Image service services and configure them to start when the system boots:
# systemctl enable openstack-glance-api.service \
  openstack-glance-registry.service
# systemctl start openstack-glance-api.service \
  openstack-glance-registry.service
ubuntu or debian
Restart the Image service services:
# service glance-registry restart
# service glance-api restart
ubuntu
By default, the Ubuntu packages create an SQLite database.
Because this configuration uses an SQL database server, you can remove the SQLite database file:
# rm -f /var/lib/glance/glance.sqlite
