The "Default configuration files vary by distribution." note is
duplicated in a lot of files. This patch moves this note into a separate
file and includes this file in all files using this note.

Change-Id: Ie61e378a217539259180f2e56282b137dd8aa30a
8.1 KiB
Install and configure compute node
The compute node handles connectivity and security groups <security
group> for instances.
Prerequisites
Before you install and configure OpenStack Networking, you must kernel networking parameters to disable reverse-path filtering:
Edit the
/etc/sysctl.conffile to contain the following parameters:net.ipv4.conf.all.rp_filter=0 net.ipv4.conf.default.rp_filter=0Implement the changes:
# sysctl -p
ubuntu or rdo or obs
Install the Networking components
ubuntu
# apt-get install neutron-plugin-linuxbridge-agentrdo
# yum install openstack-neutron-linuxbridgeobs
# zypper install --no-recommends openstack-neutron-linuxbridge-agent ipsetdebian
Install and configure the Networking components
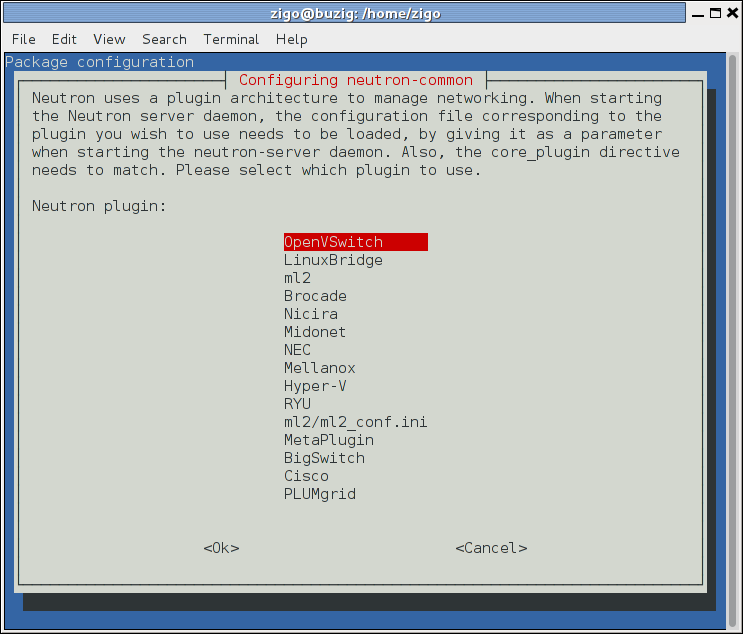
# apt-get install neutron-plugin-linuxbridge-agentRespond to prompts for
database management,Identity service credentials,service endpoint, andmessage queue credentials.Select the ML2 plug-in:
Note
Selecting the ML2 plug-in also populates the
service_pluginsandallow_overlapping_ipsoptions in the/etc/neutron/neutron.conffile with the appropriate values.
ubuntu or rdo or obs
To configure the Networking common components
The Networking common component configuration includes the authentication mechanism, message queue, and plug-in.
Edit the /etc/neutron/neutron.conf file.
In the
[database]section, comment out anyconnectionoptions because compute nodes do not directly access the database.In the
[DEFAULT]and[oslo_messaging_rabbit]sections, configure RabbitMQ message queue access:[DEFAULT] ... rpc_backend = rabbit [oslo_messaging_rabbit] ... rabbit_host = controller rabbit_userid = openstack rabbit_password = RABBIT_PASSReplace
RABBIT_PASSwith the password you chose for theopenstackaccount in RabbitMQ.In the
[DEFAULT]and[keystone_authtoken]sections, configure Identity service access:[DEFAULT] ... auth_strategy = keystone [keystone_authtoken] ... auth_uri = http://controller:5000 auth_url = http://controller:35357 auth_plugin = password project_domain_id = default user_domain_id = default project_name = service username = neutron password = NEUTRON_PASSReplace
NEUTRON_PASSwith the password you chose for theneutronuser in the Identity service.Note
Comment out or remove any other options in the
[keystone_authtoken]section.(Optional) To assist with troubleshooting, enable verbose logging in the
[DEFAULT]section:[DEFAULT] ... verbose = True
Configure networking options
Choose the same networking option that you chose for the controller node to configure services specific to it.
Note
Option 2 augments option 1 with the layer-3 (routing) service and enables self-service (private) networks. If you want to use public (provider) and private (self-service) networks, choose option 2.
neutron-compute-install-option1.rst neutron-compute-install-option2.rst
Configure Compute to use Networking
Edit the /etc/nova/nova.conf file.
In the
[DEFAULT]section, configure Compute to use the Networking service:[DEFAULT] ... network_api_class = nova.network.neutronv2.api.API security_group_api = neutron linuxnet_interface_driver = nova.network.linux_net.LinuxOVSInterfaceDriver firewall_driver = nova.virt.firewall.NoopFirewallDriverNote
The
firewall_driveroption uses theNoopFirewallDrivervalue because Compute delegates security group (firewall) operation to the Networking service.In the
[neutron]section, configure access parameters:[neutron] ... url = http://controller:9696 auth_strategy = keystone admin_auth_url = http://controller:35357/v2.0 admin_tenant_name = service admin_username = neutron admin_password = NEUTRON_PASSReplace
NEUTRON_PASSwith the password you chose for theneutronuser in the Identity service.
Finalize installation
rdo
The Networking service initialization scripts expect a symbolic link
/etc/neutron/plugin.inipointing to the ML2 plug-in configuration file,/etc/neutron/plugins/ml2/ml2_conf.ini. If this symbolic link does not exist, create it using the following command:# ln -s /etc/neutron/plugins/ml2/ml2_conf.ini /etc/neutron/plugin.iniDue to a packaging issue, the Linux bridge agent initialization script explicitly looks for the Linux bridge plug-in configuration file rather than the agent configuration file. Run the following commands to resolve this issue:
# cp /usr/lib/systemd/system/neutron-linuxbridge-agent.service \
  /usr/lib/systemd/system/neutron-linuxbridge-agent.service.orig
# sed -i 's,openvswitch/linuxbridge_neutron_plugin.ini,ml2/linuxbridge_agent.ini,g' \
  /usr/lib/systemd/system/neutron-linuxbridge-agent.service
Note
Future upgrades of the
neutron-linuxbridge-agentpackage may overwrite this modification.Restart the Compute service:
# systemctl restart openstack-nova-compute.serviceStart the Linux bridge agent and configure it to start when the system boots:
# systemctl enable neutron-linuxbridge-agent.service
# systemctl start neutron-linuxbridge-agent.service
obs
The Networking service initialization scripts expect the variable
NEUTRON_PLUGIN_CONFin the/etc/sysconfig/neutronfile to reference the ML2 plug-in configuration file. Edit the/etc/sysconfig/neutronfile and add the following:NEUTRON_PLUGIN_CONF="/etc/neutron/plugins/ml2/ml2_conf.ini"Restart the Compute service:
# systemctl restart openstack-nova-compute.serviceStart the Linux Bridge agent and configure it to start when the system boots:
# systemctl enable openstack-neutron-linuxbridge-agent.service
# systemctl start openstack-neutron-linuxbridge-agent.service
ubuntu or debian
Restart the Compute service:
# service nova-compute restartDue to a packaging issue, the Linux bridge agent initialization script explicitly looks for the ML2 plug-in configuration file rather than the agent configuration file. Run the following commands to resolve this issue:
# cp /etc/init/neutron-plugin-linuxbridge-agent.conf \
  /etc/init/neutron-plugin-linuxbridge-agent.conf.orig
# sed -i 's,ml2_conf.ini,linuxbridge_agent.ini,g' \
  /etc/init/neutron-plugin-linuxbridge-agent.conf
Restart the Linux bridge agent:
# service neutron-plugin-linuxbridge-agent restart
