11 KiB
MidoNet Fuel Plugin User Guide
Once the Fuel MidoNet plugin has been installed (following Installation Guide <installation_guide>), you
can create OpenStack environments that use MidoNet SDN
controller as a Neutron back-end.
MidoNet Networks
MidoNet changes the behaviour of default Neutron deployments, understanding what MidoNet plugin does, especially in regard to external networks, is essential to configure and use MidoNet Fuel plugin properly.
MidoNet plugin is compatible with both Neutron + GRE and Neutron + VxLAN network tunnelling overlays, so let's focus on showing the differences between the Neutron default ML2 deployments first.
Neutron without MidoNet plugin
Fuel 7.0 reference architecture contains some useful information in Neutron Network Topologies section. First, let's have an overview of Neutron-default ML2 topolgy:
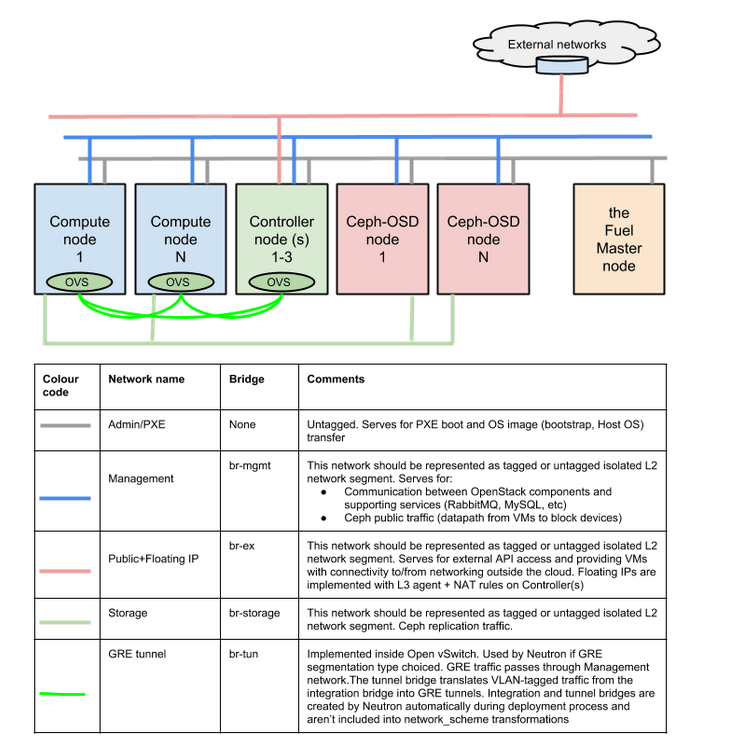
In this topology, red, or "North" network represents the Public Internet, including Floating IP subnet assigned to OpenStack cloud. That means API access to services and Virtual Machines' Floating IPs share the same L2/L3 network. This topology overloads the Controllers' traffic, since Neutron L3 agent service is running on the controller, answers all ARP requests coming from "North" traffic that belong to Virtual Machines' Floating IPs, does NAT on all of the traffic destined to Floating IP assigned to Virtual Machines and places the resulting packets in the overlay of the green, "South" network (br-tun).
Node hosting Neutron Controller has to:
- Serve the API requests coming from users
- Run the data and RPC messaging services (Rabbitmq and MySQL is running on the controllers as well)
- Handle all the North-South traffic that comes to and from the Virtual Machines.
Neutron with MidoNet plugin
With MidoNet, Neutron separates the control traffic from the data traffic. Even the Floating IPs live in the network overlay. Floating IP subnet is separated from the services API network range (called Public Network on Fuel and represented by the red network below) and MidoNet gateway advertises the routes that belong to Floating Ranges to BGP peers. So MidoNet plugin forces you to define a new Network on its settings, and allocation-range from environment settings get overridden.
MidoNet deployment topology:
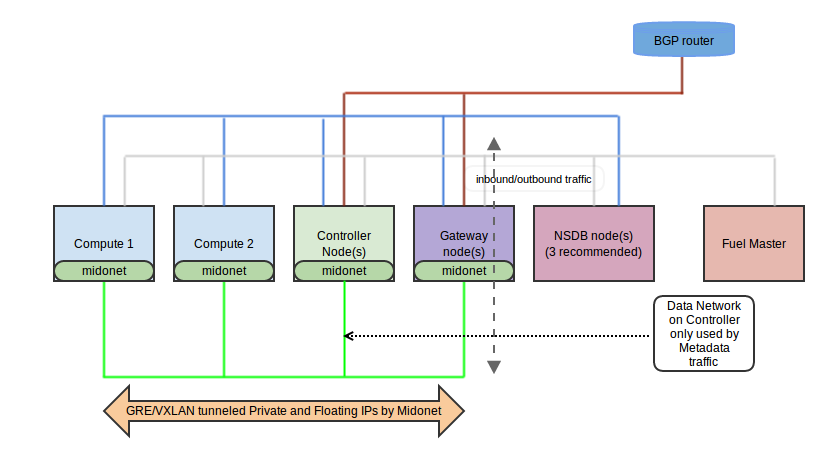
On this topology diagram:
- External Public & API networks is the red one on the diagram. Only Controllers (access to OpenStack APIs and Horizon) and Gateway need access to this network. On the external side of this underlay we expect an ISP BGP router(s), ready to learn our OpenStack Floating IP subnet route so it can pass traffic to our virtual machines.
- Private network underlay is the green one on the diagram. All the traffic between virtual machines is tunneled by MidoNet on top of this network. Including traffic to and form floating IP addresses.
- Management network is the blue one. All nodes need to be connected to it, this network is used for access to NSDB nodes in order to access virtual networks topology and flow information.
- PXE/Admin network is the gray one. Needed by Fuel master to orchestrate the deployment.
- Storage network is not shown on the diagram, as it is out of scope of this guide (and Neutron & MidoNet itself).
MidoNet gateway is native distributed system, one can place as many gateways necessary, so North-South traffic can be distributed and balanced (Although due plugin limitation you can only deploy one). Once BGP sessions are established and routes are exchanged between BGP "peers", each North-to-South network packet gets routed from the External Public API network to one of the MidoNet gateways. It does not matter which of them gets the packet, they work as if they are a single entity. MidoNet gateway sends the inbound packet directly to the Compute that hosts the target virtual machine.
In this way controller nodes gets significantly less overloaded, since they only need to answer user requests and they don't handle VM traffic at all (the only exception is the metadata traffic at VM provisioning time).
Following the learned concepts, we are ready to create a Fuel environment that uses MidoNet.
Select Environment
When creating the environment in the Fuel UI wizard, choose Neutron with MidoNet on the Networking Setup section:
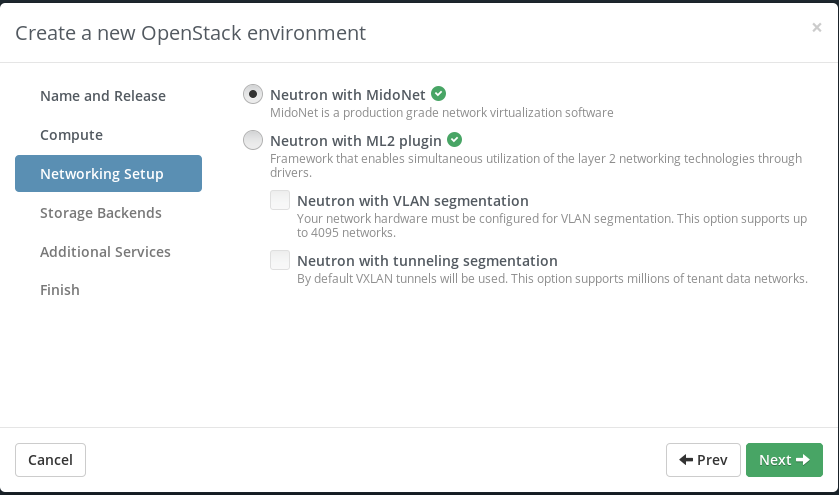
After that, one will be able to choose between GRE or VXLAN encapsulation (WEB interface; Settings, Other section). MidoNet works with both of the encapsulation technologies, but VXLAN may offer better performance, especially for the deployments of a larger scale.
MidoNet plugin does not interact with the rest of the options, so choose whatever your deployment demands on them. Follow instructions from the official Mirantis OpenStack documentation to finish the configuration.
Configure MidoNet Plugin
Once the environment is created, open the Settings tab of the Fuel Web UI, and go to the Other section:
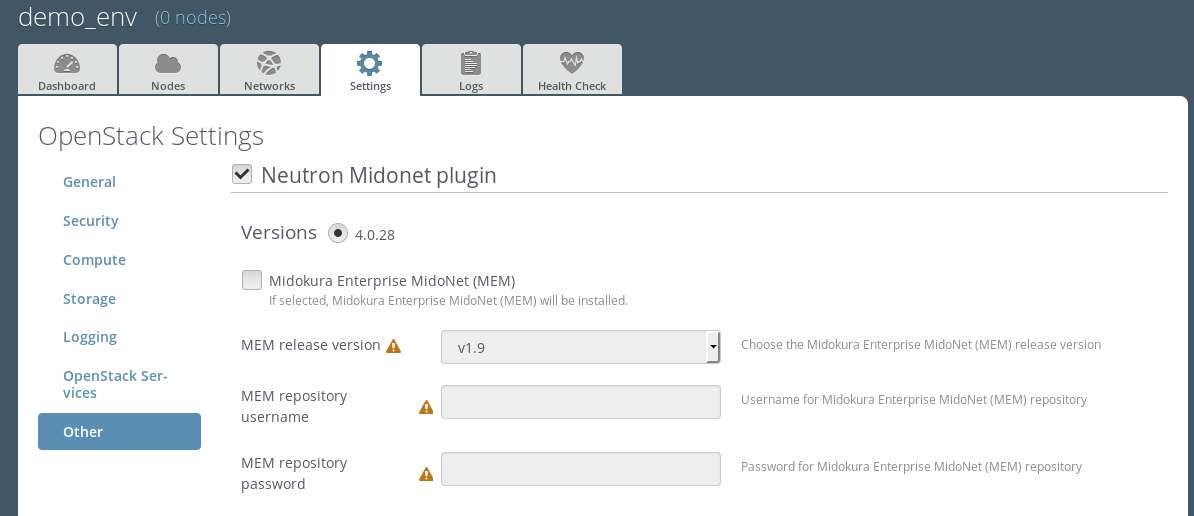
Install Midokura Enterprise MidoNet (Optional)
Installing Midokura Enterprise MidoNet, you will be able to use some specific features from MidoNet only available on the Enterprise version.
Activate the option Install Midokura Enterprise MidoNet.

Select the Midokura Enterprise MidoNet (MEM) version (only 1.9 available now) and fill the Username and Password fields for downloading the packages from the repository.

Choose Tunnel Type
MidoNet tunnelling is compatible with GRE and VXLAN.

Both are supported by MidoNet, but VxLAN is recommended for its performance.
Floating Network Options
Configure the Floating fields of the plugin options (they are already been filled by default, but you will need to change them for sure):
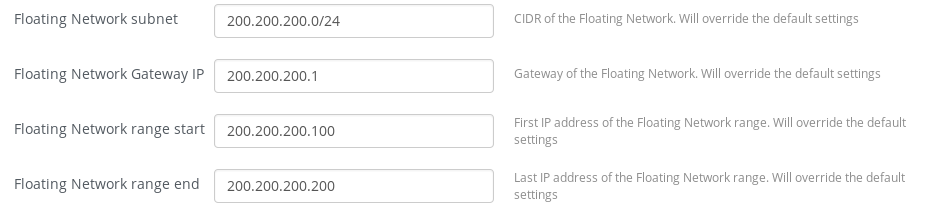
Configuring the floating fields in MidoNet plugin, you will override most of the options of the Neutron L3/Floating Network Parameters section of the Networks tab of the environment:

So this Floating IP range (first row) will be completely ignored. This range has to match with the CIDR of the Public Network:
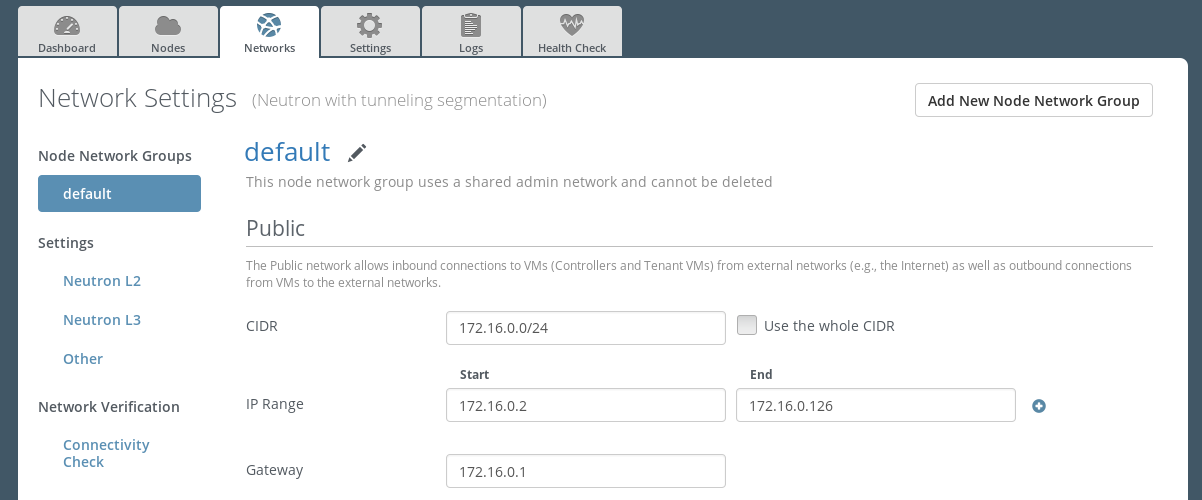
Which only will be used for API-accessible IPs to the OpenStack services but not for Virtual Machine's floating IPs. Please refer to Neutron with Midonet plugin section of this document if it is not clear enough to you.
Configure BGP
Fill the BGP attributes:
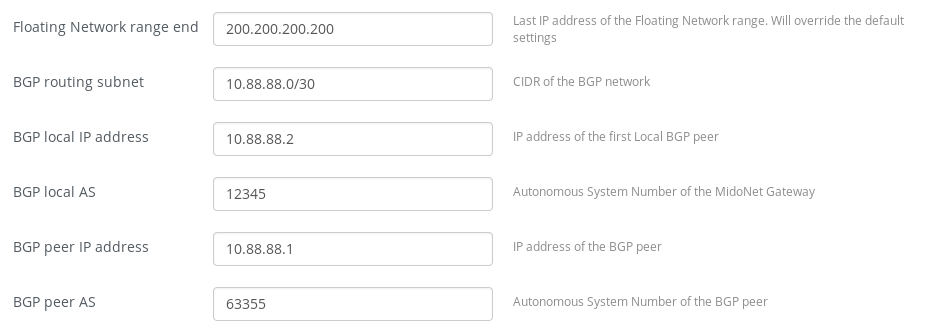
There is a nice tutorial in this document: Setting up test BGP peer to run a BGP peer for testing environments.
Assign Roles to Nodes
Go to the Nodes tab and you will see the Network State DataBase and MidoNet HA Gateway roles available to be assigned to roles.
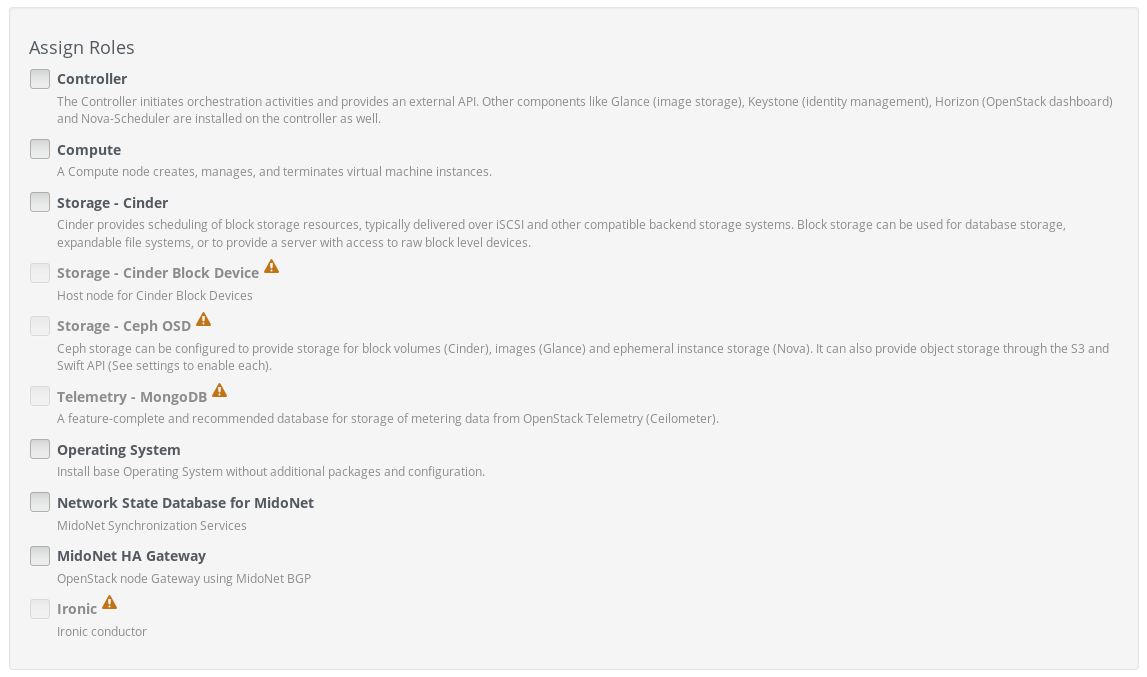
Some general advice to be followed:
- Gateway role should be given to a dedicated node.
- NSDB role can be combined with any other roles, but note that it needs at least 4GB RAM for itself (dedicated storage hihgly recommended).
Fuel will force you to choose at least one NSDB node in your environment (3 are recommended).
Finish environment configuration
We recommend to run a Connectivity Check before deploy the environment
Operations and Troubleshooting
A successful deployment done with MidoNet Fuel plugin will produce fully working OpenStack environment, with MidoNet as a Neutron network back-end. MidoNet is fully compatible with Neutron and Nova APIs and most of its aspects can be directly managed by OpenStack Horizon WEB interface, as well as Neutron API.
Operating MidoNet
For advanced networking features supported by MidoNet please see MidoNet Operations Guide. For general MidoNet troubleshooting, assuming the deployment went fine, please see MidoNet Troubleshooting Guide.
Troubleshooting MidoNet Fuel deployment
In a case MidoNet Fuel deployment failed for some reason, first thing
to do is to make sure that the initiated deployment satisfies the plugin
Known Limitations<known_limitations>.
In a case MidoNet Fuel deployment failed for some other reason, useful thing to be checked are various log outputs available in Fuel WEB UI. Click on the Logs tab and observe logging information. Default log displayed in the WEB interface shows "Web backend" logs, which are too general to provide any troubleshooting information, we want to check "Astute" logs, which can be selected by clicking Source drop down menu, followed by clicking Show button. In case of deployment errors, important messages will be shown in red, identifying which stage of deployment may have failed, and on which node(s).
Next step is to look into how deployment tasks were executed at target nodes. After identifying nodes in previous step, select "Other servers" in the Logs drop-down menu, following by selecting an appropriate node in Node and "puppet" in Source drop-down menus. Again, important failures should be marked in red. Depending on user's level of understanding of these messages, they should either be included in MidoNet support claims to help to help the troubleshooting or an action can be taken by user to prevent issue from happening on re-deployment.