4.4 KiB
Guide to the SolidFire Cinder Plugin version 1.0.0 for Fuel
This document provides instructions for installing, configuring and using SolidFire Cinder plugin for Fuel.
Key terms, acronyms and abbreviations
- MVIP
-
Management Virtual IP (MVIP) is the IP address (or hostname) of the management interface to the SolidFire cluster
- Cluster Admin account
-
The Cluster Admin account on a SolidFire cluster is the account by which you administer the SolidFire cluster.
- SolidFire accounts
-
SolidFire accounts are automatically created by the SolidFire OpenStack driver as needed based on the Project ID. These accounts manage the CHAP authentication for the volumes allocated by that project. No configuration is needed for these accounts.
SolidFire Cinder
The SolidFire Cinder Fuel plugin provides an automated method to insert the necessary lines into the cinder.conf file. The plugin extends the Fuel GUI to provide the necessary entry locations for the information for the configuration file.
License
| Component | License type |
|---|---|
No Components are present |
Requirements
| Requirement | Version/Comment |
|---|---|
Fuel |
|
Limitations
- Fuel does not support multiple storage backends in Cinder, therefore the SolidFire Cinder Fuel plugin also does not support multiple backends.
- The SolidFire Cinder Fuel plugin does however provide the ability to create a configuarion file stanza such that when multi-backend support is added to Fuel the stanza is correct.
Installation Guide
SolidFire Cinder plugin installation
Download the plugin from Fuel Plugins Catalog.
Copy the plugin to an already installed Fuel Master node. If you do not have the Fuel Master node yet, follow the instructions from the official Mirantis OpenStack documentation:
scp fuel-plugin-solidfire-cinder-1.0-1.0.1-1.noarch.rpm root@:<the_Fuel_Master_node_IP>:/tmpLog into the Fuel Master node and install the plugin:
cd /tmp
fuel plugins --install /tmp/fuel-plugin-solidfire-cinder-1.0-1.0.1-1.noarch.rpm
Solidfire Cinder plugin configuration
After plugin is installed, create a new OpenStack environment following the instructions.
Configure your environment following the official Mirantis OpenStack documentation
Open the Settings tab of the Fuel web UI and scroll down the page. Select the Fuel plugin checkbox to enable SolidFire Cinder plugin for Fuel:
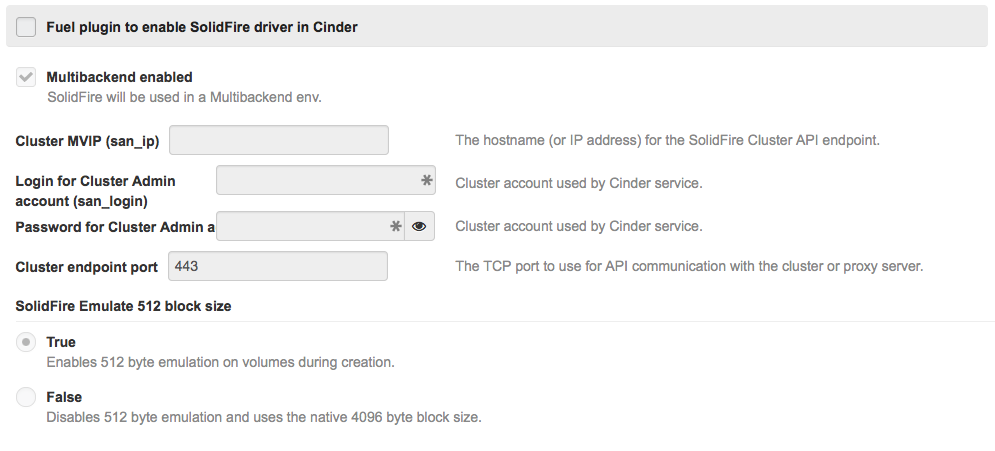
Enter the Cluster Admin account information (account and password) and the IP address of the Management Virtual IP (MVIP) of the SolidFire Cluster.
Select the defaults for all other SolidFire options.
Once configuration is done, you can run network verification check and deploy the environment.
User Guide
Once the OpenStack instance is deployed by Fuel, the SolidFire plugin provides no user configurable or maintainable options.
The SolidFire driver (once configured by Fuel) will output all logs into the cinder-volume process log file with the 'SolidFire' title.
Known issues
There are no known issues at this time.
Appendix
The SolidFire driver documentation contains complete information on all SolidFire driver options.