19 KiB
Quick-Start Installation and Tutorial
Zuul is not like other CI or CD systems. It is a project gating system designed to assist developers in taking a change from proposal through deployment. Zuul can support any number of workflow processes and systems, but to help you get started with Zuul, this tutorial will walk through setting up a basic gating configuration which protects projects from merging broken code.
This tutorial is entirely self-contained and may safely be run on a workstation. The only requirements are a network connection and the ability to run Docker containers.
This tutorial supplies a working Gerrit for code review, though the concepts you will learn apply equally to GitHub.
Note
Even if you don't ultimately intend to use Gerrit, you are encouraged to follow this tutorial to learn how to set up and use Zuul.
At the end of the tutorial, you will find further information about how to configure your Zuul to interact with GitHub.
Start Zuul Containers
Before you start, ensure that some needed packages are installed.
# Red Hat / Fedora / CentOS:

sudo yum install docker docker-compose git git-review

# OpenSuse:

sudo zypper install docker docker-compose git git-review

# Ubuntu / Debian:

sudo apt-get install docker-compose git git-review

# Start and Enable the docker service on Fedora / CentOS
# Red Hat / OpenSuse:

sudo systemctl enable docker.service
sudo systemctl start docker.service
Clone the Zuul repository:
git clone https://git.zuul-ci.org/zuulThen cd into the directory containing this document, and run docker-compose in order to start Zuul, Nodepool and Gerrit.
cd zuul/doc/source/admin/examples
sudo docker-compose up
All of the services will be started with debug-level logging sent to the standard output of the terminal where docker-compose is running. You will see a considerable amount of information scroll by, including some errors. Zuul will immediately attempt to connect to Gerrit and begin processing, even before Gerrit has fully initialized. The docker composition includes scripts to configure Gerrit and create an account for Zuul. Once this has all completed, the system should automatically connect, stabilize and become idle. When this is complete, you will have the following services running:
- Zookeeper
- Gerrit
- Nodepool Launcher
- Zuul Scheduler
- Zuul Web Server
- Zuul Executor
- Apache HTTPD
And a long-running static test node used by Nodepool and Zuul upon which to run tests.
The Zuul scheduler is configured to connect to Gerrit via a
connection named gerrit. Zuul can interact with as many
systems as necessary, each such connection is assigned a name for use in
the Zuul configuration.
Zuul is a multi-tenant application, so that differing needs of
independent work-groups can be supported from one system. This example
configures a single tenant named example-tenant. Assigned
to this tenant are three projects: zuul-config,
test1 and test2. These have already been
created in Gerrit and are ready for us to begin using.
Add Your Gerrit Account
Before you can interact with Gerrit, you will need to create an
account. The initialization script has already created an account for
Zuul, but has left the task of creating your own account to you so that
you can provide your own SSH key. You may safely use any existing SSH
key on your workstation, or you may create a new one by running
ssh-keygen.
Gerrit is configured in a development mode where passwords are not required in the web interface and you may become any user in the system at any time.
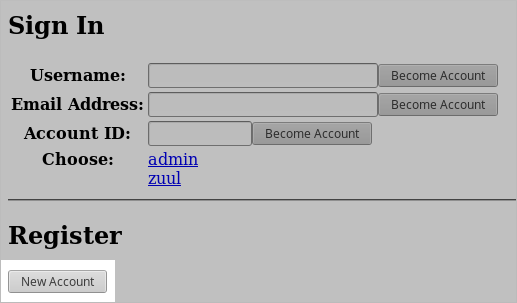
To create your Gerrit account, visit http://localhost:8080 in your browser and click Sign in in the top right corner.
Then click New Account under Register.
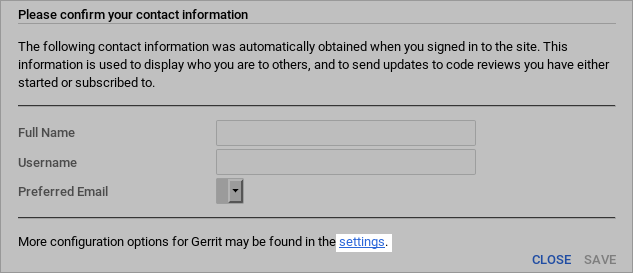
Don't bother to enter anything into the confirmation dialog that pops up, instead, click the settings link at the bottom.
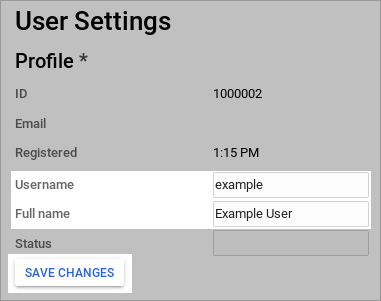
In the Profile section at the top, enter the username you use to log into your workstation in the Username field and your full name in the Full name field, then click Save Changes.
Scroll down to the Email Addresses section and enter your email address into the New email address field, then click Send Verification. Since Gerrit is in developer mode, it will not actually send any email, and the address will be automatically confirmed. This step is useful since several parts of the Gerrit user interface expect to be able to display email addresses.

Scroll down to the SSH keys section
and copy and paste the contents of ~/.ssh/id_rsa.pub into
the New SSH key field and click Add New SSH Key.
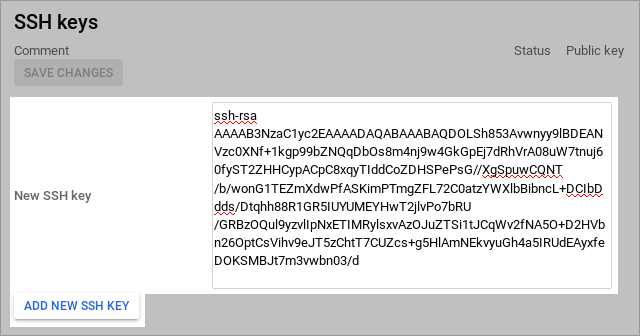
Click the Reload button in your browser to reload the page with the new settings in effect. At this point you have created and logged into your personal account in Gerrit and are ready to begin configuring Zuul.
Configure Zuul Pipelines
Zuul recognizes two types of projects: config
projects<config-project> and untrusted
projects<untrusted-project>. An untrusted project
is a normal project from Zuul's point of view. In a gating system, it
contains the software under development and/or most of the job content
that Zuul will run. A config project is a special project that
contains the Zuul's configuration. Because it has access to normally
restricted features in Zuul, changes to this repository are not
dynamically evaluated by Zuul. The security and functionality of the
rest of the system depends on this repository, so it is best to limit
what is contained within it to the minimum, and ensure thorough code
review practices when changes are made.
Zuul has no built-in workflow definitions, so in order for it to do
anything, you will need to begin by making changes to a config
project. The initialization script has already created a project
named zuul-config which you should now clone onto your
workstation:
git clone http://localhost:8080/zuul-configYou will find that this repository is empty. Zuul reads its
configuration from either a single file or a directory. In a Config
Project with substantial Zuul configuration, you may find it
easiest to use the zuul.d directory for Zuul configuration.
Later, in Untrusted Projects you will use a single file for
in-repo configuration. Make the directory:
cd zuul-config
mkdir zuul.d
The first type of configuration items we need to add are the
Pipelines we intend to use. In Zuul, a Pipeline represents a workflow
action. It is triggered by some action on a connection. Projects are
able to attach jobs to run in that pipeline, and when they complete, the
results are reported along with actions which may trigger further
Pipelines. In a gating system two pipelines are required: check and gate. In our system,
check will be triggered when a patch is uploaded to Gerrit,
so that we are able to immediately run tests and report whether the
change works and is therefore able to merge. The gate
pipeline is triggered when a code reviewer approves the change in
Gerrit. It will run test jobs again (in case other changes have merged
since the change in question was uploaded) and if these final tests
pass, will automatically merge the change. To configure these pipelines,
copy the following file into `zuul.d/pipelines.yaml`:
examples/zuul-config/zuul.d/pipelines.yaml
Once we have bootstrapped our initial Zuul configuration, we will
want to use the gating process on this repository too, so we need to
attach the zuul-config repository to the check
and gate pipelines we are about to create. There are no
jobs defined yet, so we must use the internally defined
noop job, which always returns success. Later on we will be
configuring some other projects, and while we will be able to
dynamically add jobs to their pipelines, those projects must first be
attached to the pipelines in order for that to work. In our system, we
want all of the projects in Gerrit to participate in the check and gate
pipelines, so we can use a regular expression to apply this to all
projects. To configure the check and gate
pipelines for zuul-config to run the noop job,
and add all projects to those pipelines (with no jobs), copy the
following file into zuul.d/projects.yaml:
examples/zuul-config/zuul.d/projects.yaml
Every real job (i.e., all jobs other than noop) must
inherit from a base job, and base jobs may only be defined in a
config-project. Let's
go ahead and add a simple base job that we can build on later. Copy the
following into zuul.d/jobs.yaml:
examples/zuul-config/zuul.d/jobs.yaml
Commit the changes and push them up for review:
git add zuul.d
git commit -m "Add initial Zuul configuration"
git review
Because Zuul is currently running with no configuration whatsoever, it will ignore this change. For this initial change which bootstraps the entire system, we will need to bypass code review (hopefully for the last time). To do this, you need to switch to the Administrator account in Gerrit. Visit http://localhost:8080 in your browser and then:
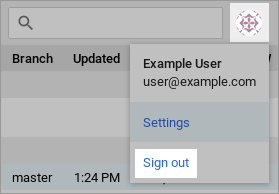
Click the avatar image in the top right corner then click Sign out.
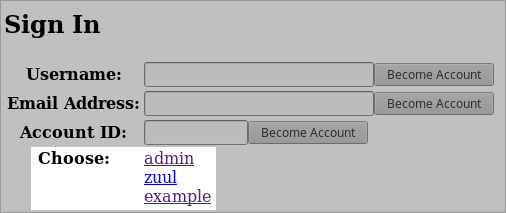
Then click the Sign in link again.
Click admin to log in as the admin user.
You will then see a list of open changes; click on the change you uploaded.

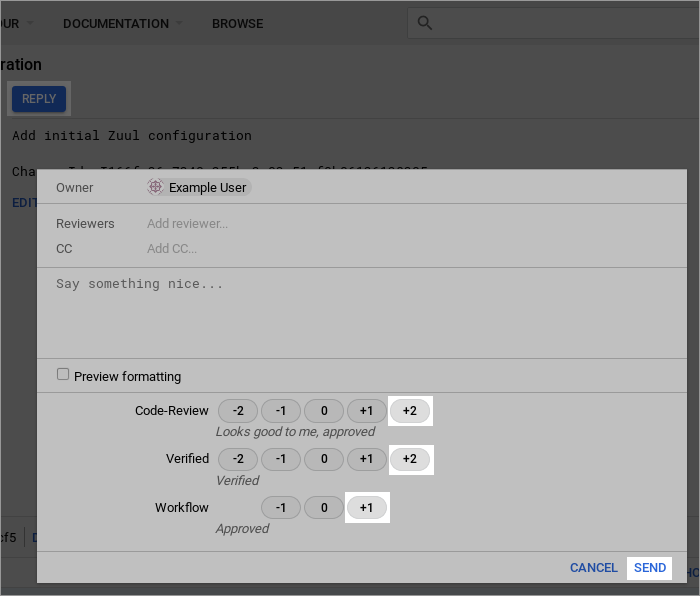
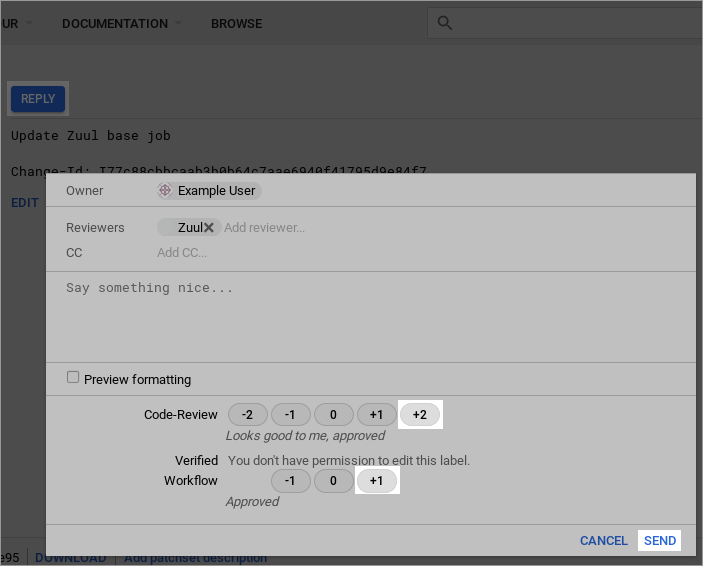
Click Reply... at the top center of the change screen. This will open a dialog where you can leave a review message and vote on the change. As the administrator, you have access to vote in all of the review categories, even Verified which is normally reserved for Zuul. Vote Code-Review: +2, Verified: +2, Workflow: +1, and then click Send to leave your approval votes.
Once the required votes have been set, the Submit button will appear in the top right; click it. This will cause the change to be merged immediately. This is normally handled by Zuul, but as the administrator you can bypass Zuul to forcibly merge a change.

Now that the initial configuration has been bootstrapped, you should not need to bypass testing and code review again, so switch back to the account you created for yourself. Click on the avatar image in the top right corner then click Sign out.
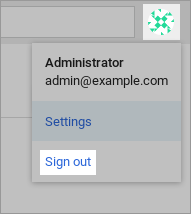
Then click the Sign in link again.
And click your username to log into your account.
Test Zuul Pipelines
Zuul is now running with a basic check and gate configuration. Now is a good time to take a look
at Zuul's web interface. Visit http://localhost:9000/t/example-tenant/status
to see the current status of the system. It should be idle, but if you
leave this page open during the following steps, you will see it update
automatically.
We can now begin adding Zuul configuration to one of our untrusted projects<untrusted-project>. Start by
cloning the test1 project which was
created by the setup script.
cd ..
git clone http://localhost:8080/test1
Every Zuul job that runs needs a playbook, so let's create a sub-directory in the project to hold playbooks:
cd test1
mkdir playbooks
Start with a simple playbook which just outputs a debug message. Copy
the following to playbooks/testjob.yaml:
examples/test1/playbooks/testjob.yaml
Now define a Zuul job which runs that playbook. Zuul will read its
configuration from any of zuul.d/ or .zuul.d/
directories, or the files zuul.yaml or
.zuul.yaml. Generally in an untrusted project
which isn't dedicated entirely to Zuul, it's best to put Zuul's
configuration in a hidden file. Copy the following to
.zuul.yaml in the root of the project:
examples/test1/zuul.yaml
Commit the changes and push them up to Gerrit for review:
git add .zuul.yaml playbooks
git commit -m "Add test Zuul job"
git review
Zuul will dynamically evaluate proposed changes to its configuration in untrusted projects immediately, so shortly after your change is uploaded, Zuul will run the new job and report back on the change.
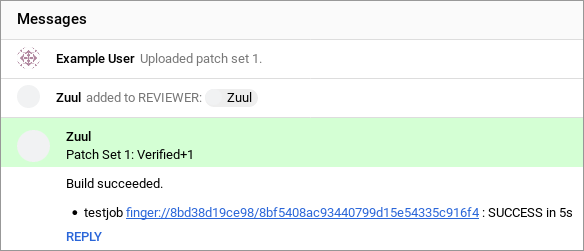
Visit http://localhost:8080/dashboard/self and open the change you just uploaded. If the build is complete, Zuul should have left a Verified: +1 vote on the change, along with a comment at the bottom. Expand the comments and you should see that the job succeeded, but there are no logs and no way to see the output, only a finger URL (which is what Zuul reports when it doesn't know where build logs are stored).
This means everything is working so far, but we need to configure a bit more before we have a useful job.
Configure a Base Job
Every Zuul tenant needs at least one base job. Zuul administrators can use a base job to customize Zuul to the local environment. This may include tasks which run both before jobs, such as setting up package mirrors or networking configuration, or after jobs, such as artifact and log storage.
Zuul doesn't take anything for granted, and even tasks such as copying the git repos for the project being tested onto the remote node must be explicitly added to a base job (and can therefore be customized as needed). The Zuul in this tutorial is pre-configured to use the zuul jobs repository which is the "standard library" of Zuul jobs and roles. We will make use of it to quickly create a base job which performs the necessary set up actions and stores build logs.
Return to the zuul-config repo that you were working in
earlier. We're going to add some playbooks to the empty base job we
created earlier. Start by creating a directory to store those
playbooks:
cd ..
cd zuul-config
mkdir -p playbooks/base
Zuul supports running any number of playbooks before a job (called
pre-run playbooks) or after a job (called post-run
playbooks). We're going to add a single pre-run playbook now.
Copy the following to playbooks/base/pre.yaml:
examples/zuul-config/playbooks/base/pre.yaml
This playbook does two things; first it creates a new SSH key and adds it to all of the hosts in the inventory, and removes the private key that Zuul normally uses to log into nodes from the running SSH agent. This is just an extra bit of protection which ensures that if Zuul's SSH key has access to any important systems, normal Zuul jobs can't use it. The second thing the playbook does is copy the git repositories that Zuul has prepared (which may have one or more changes being tested) to all of the nodes used in the job.
Next, add a post-run playbook to remove the per-build SSH
key. Copy the following to
playbooks/base/post-ssh.yaml:
examples/zuul-config/playbooks/base/post-ssh.yaml
This is the complement of the add-build-sshkey role in the pre-run playbook
-- it simply removes the per-build ssh key from any remote systems. Zuul
always tries to run all of the post-run playbooks regardless of whether
any previous playbooks have failed. Because we always want log
collection to run and we want it to run last, we create a second
post-run playbook for it. Copy the following to
playbooks/base/post-logs.yaml:
examples/zuul-config/playbooks/base/post-logs.yaml
This tutorial is running an Apache webserver in a container which will serve build logs from a volume that is shared with the Zuul executor. That volume is mounted at /srv/static/logs, which is the default location in the upload-logs role. The role also supports copying files to a remote server via SCP; see the role documentation for how to configure it. For this simple case, the only option we need to provide is the URL where the logs can ultimately be found.
Note
Zuul-jobs also contains a role to upload logs to an OpenStack Object Storage (swift) container. If you create a role to upload logs to another system, please feel free to contribute it to the zuul-jobs repository for others to use.
Now that the new playbooks are in place, update the base
job definition to include them. Overwrite zuul.d/jobs.yaml
with the following:
examples/zuul-config/zuul.d/jobs2.yaml
Then commit the change and upload it to Gerrit for review:
git add playbooks zuul.d/jobs.yaml
git commit -m "Update Zuul base job"
git review
Visit http://localhost:8080/dashboard/self
and open the zuul-config change you just uploaded.
You should see a Verified +1 vote from Zuul. Click Reply then vote Code-Review: +2 and Workflow: +1 then click Send.
Wait a few moments for Zuul to process the event, and then reload the page. The change should have been merged.
Visit http://localhost:8080/dashboard/self
and return to the test1 change you uploaded earlier. Click
Reply then type recheck into the text field and click Send.
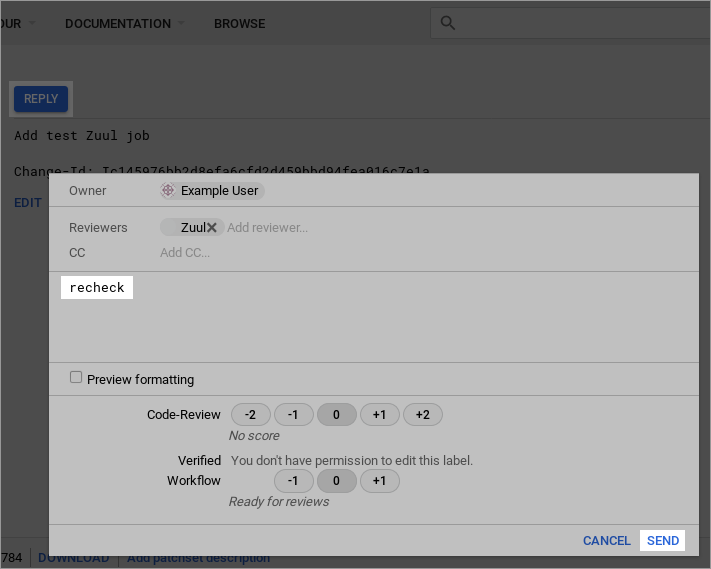
This will cause Zuul to re-run the test job we created earlier. This time it will run with the updated base job configuration, and when complete, it will report the published log location as a comment on the change:
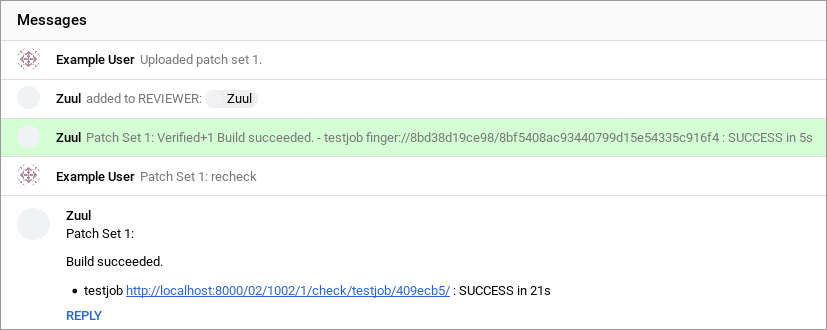
Follow the link and you will be able to browse the console log for the job. In the middle of the log, you should see the "Hello, world!" output from the job's playbook.
Further Steps
If you would like to make further changes to Zuul, its configuration
files are located in the zuul/doc/source/admin/examples
directory and are bind-mounted into the running containers. You may edit
them and restart the Zuul containers to make changes.
If you would like to connect your Zuul to GitHub, see github_driver.