4.0 KiB
Home OpenStack-Ansible Installation Guide
Chapter 7. OpenStack playbooks
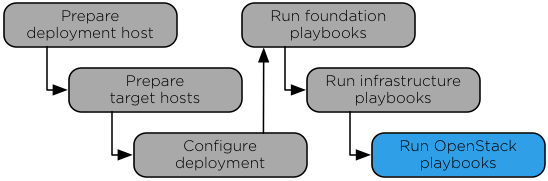
Figure 7.1. Installation work flow
The setup-openstack.yml playbook installs OpenStack
services and performs the following operations:
- Installs Identity (keystone)
- Installs the Image service (glance)
- Installs Block Storage (cinder)
- Installs Compute (nova)
- Installs Networking (neutron)
- Installs Orchestration (heat)
- Installs Dashboard (horizon)
- Installs Telemetry (ceilometer and aodh)
- Installs Object Storage (swift)
- Installs Ironic
Running the OpenStack playbook
Change to the
/opt/openstack-ansible/playbooksdirectory.Run the OpenStack setup playbook:
# openstack-ansible setup-openstack.ymlConfirm satisfactory completion with zero items unreachable or failed.
Utility container
The utility container provides a space where miscellaneous tools and software are installed. Tools and objects are placed in a utility container if they do not require a dedicated container or if it is impractical to create a new container for a single tool or object. Utility containers are also used when tools cannot be installed directly onto a host.
For example, the tempest playbooks are installed on the utility container since tempest testing does not need a container of its own.
Verifying OpenStack operation
Verify basic operation of the OpenStack API and dashboard.
Procedure 8.1. Verifying the API
The utility container provides a CLI environment for additional configuration and testing.
Determine the utility container name:
# lxc-ls | grep utility
infra1_utility_container-161a4084
Access the utility container:
# lxc-attach -n infra1_utility_container-161a4084Source the
admintenant credentials:# source /root/openrcRun an OpenStack command that uses one or more APIs. For example:
# openstack user list
+----------------------------------+--------------------+
| ID                               | Name               |
+----------------------------------+--------------------+
| 08fe5eeeae314d578bba0e47e7884f3a | alt_demo           |
| 0aa10040555e47c09a30d2240e474467 | dispersion         |
| 10d028f9e47b4d1c868410c977abc3df | glance             |
| 249f9ad93c024f739a17ca30a96ff8ee | demo               |
| 39c07b47ee8a47bc9f9214dca4435461 | swift              |
| 3e88edbf46534173bc4fd8895fa4c364 | cinder             |
| 41bef7daf95a4e72af0986ec0583c5f4 | neutron            |
| 4f89276ee4304a3d825d07b5de0f4306 | admin              |
| 943a97a249894e72887aae9976ca8a5e | nova               |
| ab4f0be01dd04170965677e53833e3c3 | stack_domain_admin |
| ac74be67a0564722b847f54357c10b29 | heat               |
| b6b1d5e76bc543cda645fa8e778dff01 | ceilometer         |
| dc001a09283a404191ff48eb41f0ffc4 | aodh               |
| e59e4379730b41209f036bbeac51b181 | keystone           |
+----------------------------------+--------------------+
Procedure 8.2. Verifying the dashboard
- With a web browser, access the dashboard using the external load
balancer IP address defined by the
external_lb_vip_addressoption in the/etc/openstack_deploy/openstack_user_config.ymlfile. The dashboard uses HTTPS on port 443. - Authenticate using the username
adminand password defined by thekeystone_auth_admin_passwordoption in the/etc/openstack_deploy/user_variables.ymlfile.
Note
Only users with administrator privileges can upload public images using the dashboard or CLI.